Editing 4k Videos Smoothly Using Proxy in Premiere Pro

31 Dec 2020

5 Min Read

It has happened to you before. Trying to edit some huge 4K or 8K RAW footage on a laptop or a medium to low spec PC and not getting the buttery smooth timeline preview you deserve to experience every time! It is for sure very frustrating and also time-consuming to work in such a bad situation. But what if I told you there is an easy solution to this problem?

How to Edit 4k Videos Fast Using Proxies

Create The Proxy In Premiere Pro

Using the Proxy option is the way to go when you are in such a situation. Proxying means that premiere will convert your footage to a less demanding codec like H.264 or Quicktime with a much lower bitrate. This will not be applied to your actual footage and is just there for your previews. The cool part of this process is that it will all be handled by premiere itself and all you have to do is push a button to switch between Original and Proxy view.

What you need to do is selecting the footage, Right-Clicking on it, Choosing Proxy and then create proxies. Here you can see Format and Preset in the opened panel.

Media Encoder

First, you have to create our own preset in a Media Encoder. Media Encoder is a software that Ingest, Transcode, Create Proxies, and output to almost any format you can imagine. This powerful tool allows you to work with media in a unified way across applications. Tight integration with Adobe Premiere Pro, After Effects, and other applications provides a seamless workflow.

4k video editing proxy premiere pro encoding preset
Creating Encoding Preset in Media Encoder

Create Encoding Preset

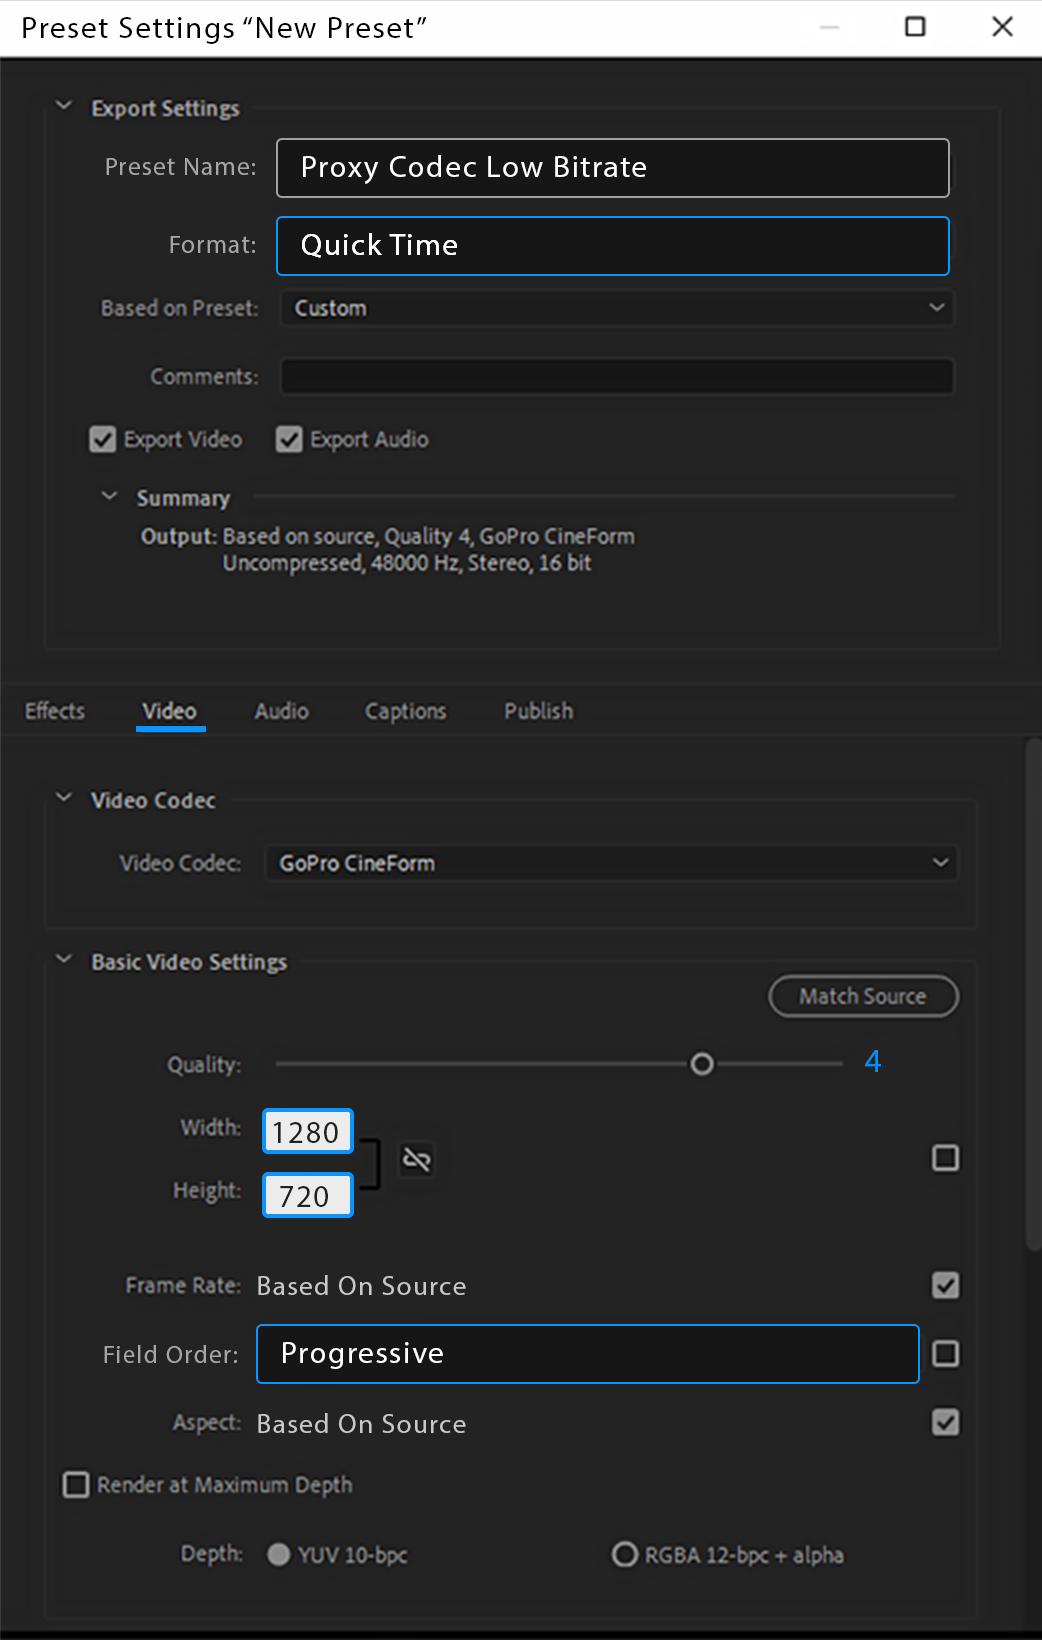
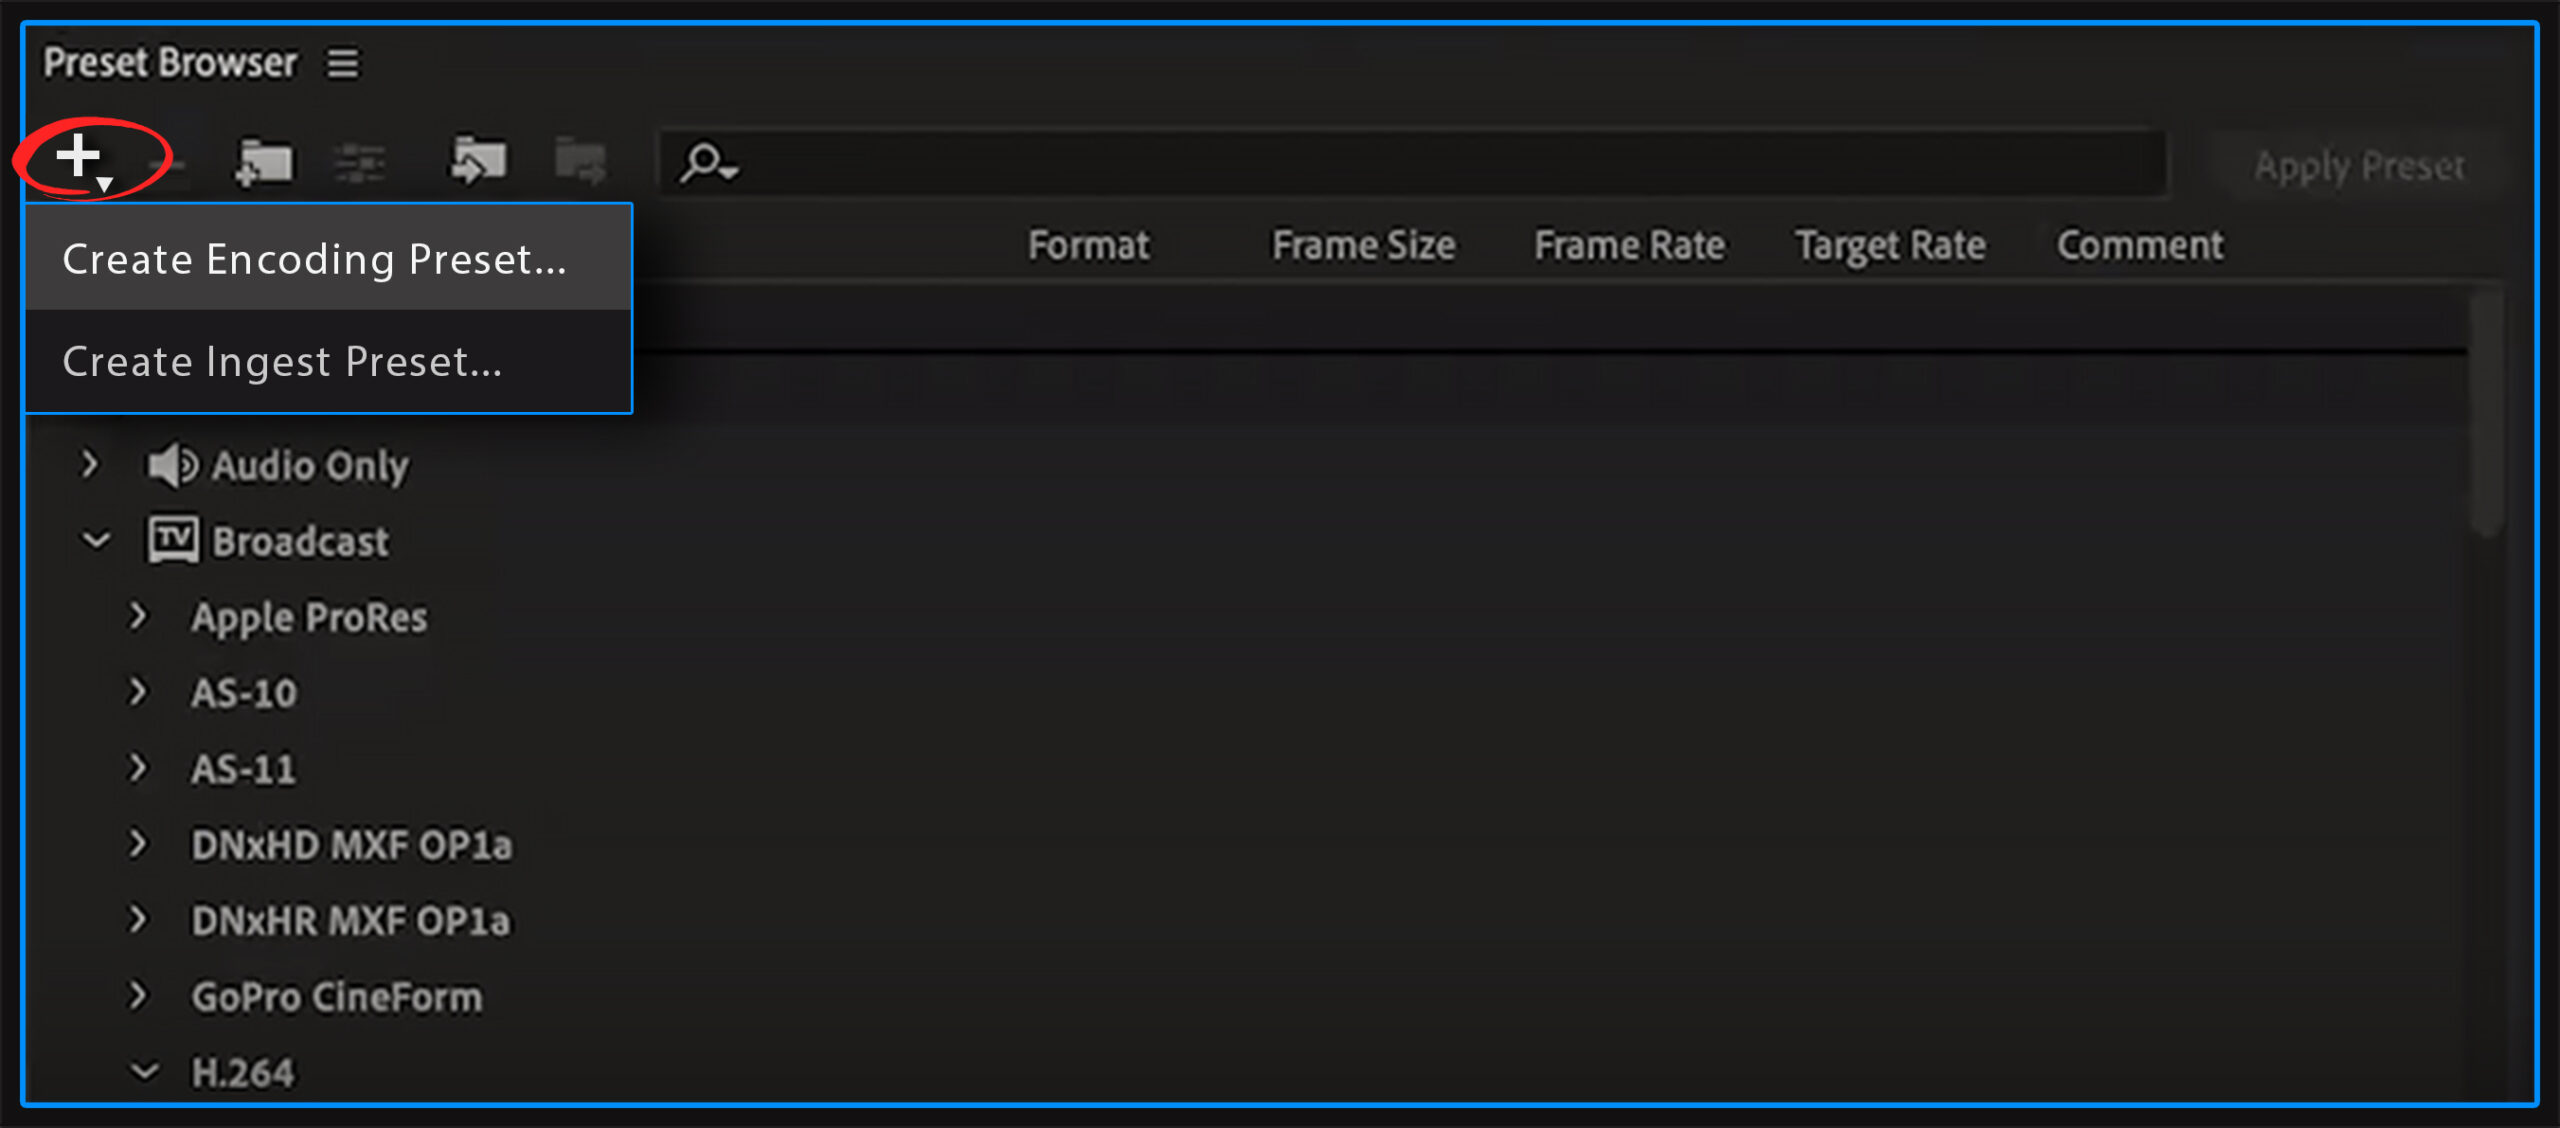
In Media Encoder you can see the Plus icon in Preset Browser, by clicking that and choosing Create Encoding Preset you will be presented with a new panel. Name it whatever you like. A suggestion is to name the preset based on the settings it has just to be able to find it easier in the future. In Format, you can choose either H.264 or QuickTime. I personally prefer QuickTime. Also, make sure you have checked both the Export Video and Export Audio.

Video Panel

In basic video settings, set your resolution to 1280*720 and your field order is going to be Progressive. Leave all the rest to be based on the source.  We can also change the aspect to maybe square pixels, but since we are going to use this preset on many other occasions, there may come a situation where the footage is anamorphic and then the square pixels will mess up the footage.

Do not choose Render at Maximum quality because we are going to use this preset for our previews and the quality is not that important here. Quality will be at 4 which is a good balance between acceptable quality and low file size.

If you want to get more info on exporting and rendering and know all these options in detail, you can click the link here to read our other blog which will talk about rendering and exporting in full detail, and I mean in full detail!

Effects Panel

Now we get to the effects panel. If you generally shoot in RAW or LOG, you can choose a color grade close to what you want to be in the end or a profile that is close to natural colors. Since I almost always shoot in RAW and LOG, this feature has been a lifesaver for me, but since I don’t wanna get in detail with colors, we are not gonna talk about it here. But you can check out this post by me that is talking about color in detail.

Overlaying and Watermarking The Proxy
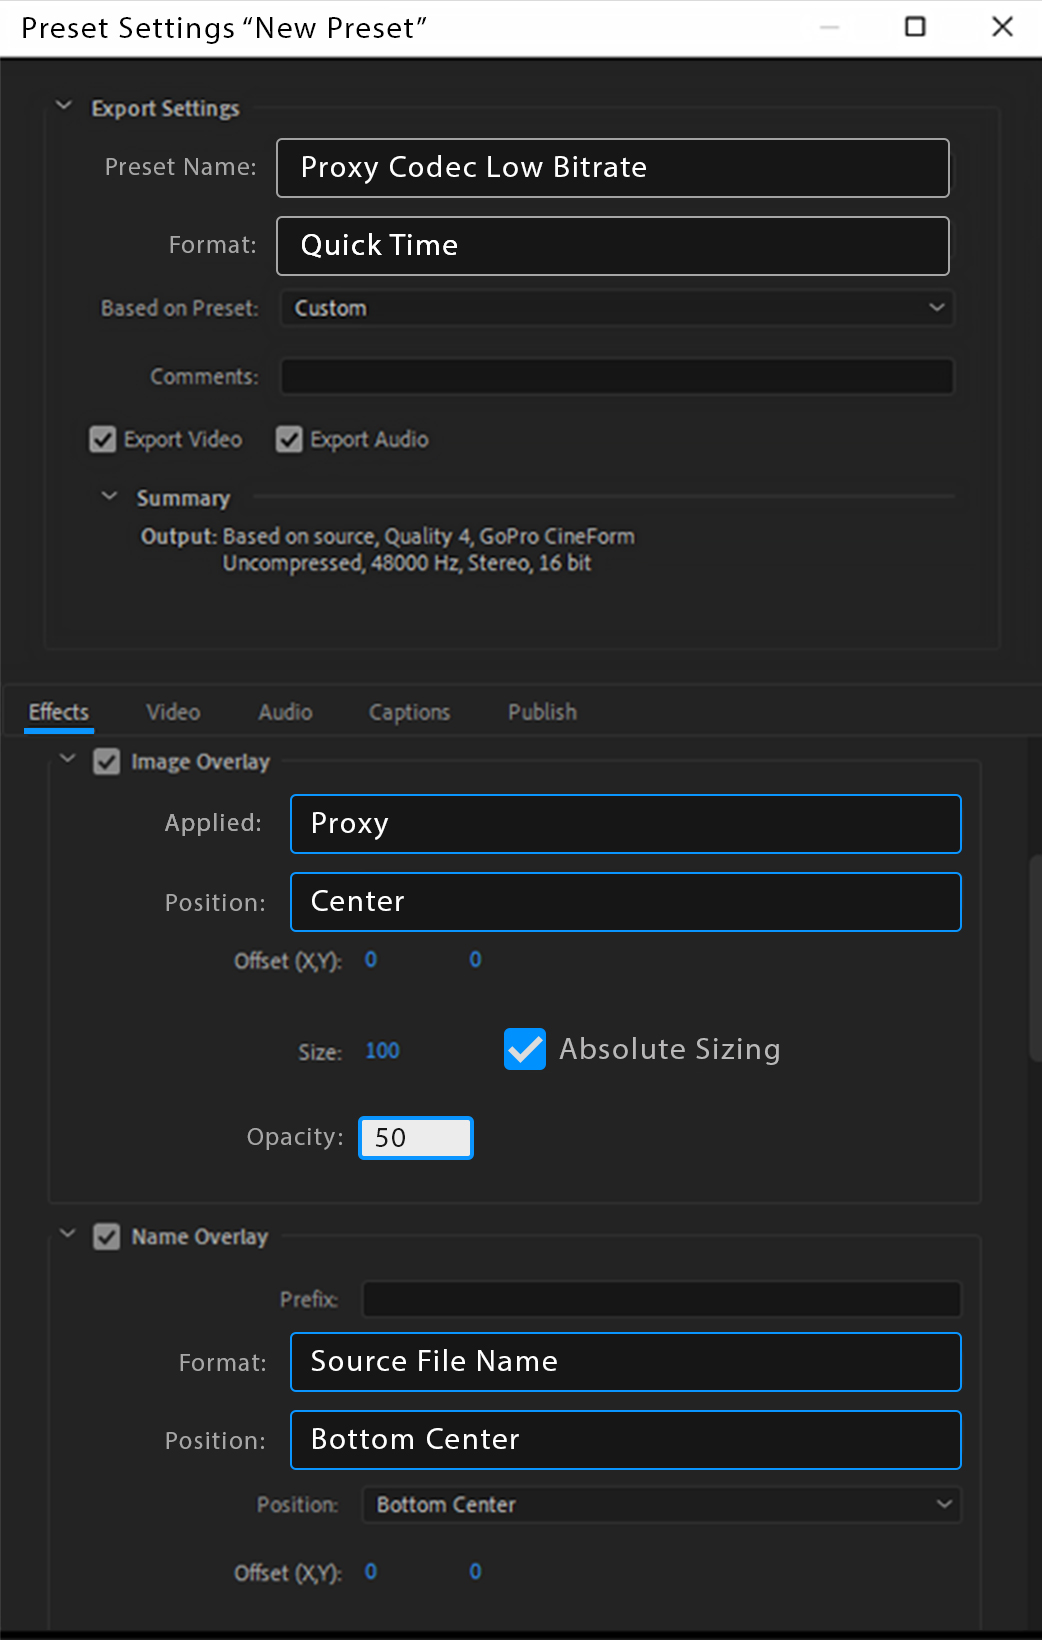
In order to be able to distinguish between the original video and the proxied one, I will choose an image or logo from the image overlay section so that it will be overlayed over the proxied videos. As an example, I have a PSD file that includes a text. You can set any image or text you like and then change the position, scale, and opacity. You can also add a watermark that will specify which footage is a proxy.
4k video editing proxy premiere pro encoder video panel
Media Encoder New Preset Video Panel
4k video editing proxy premiere pro encoder effects panel
Media Encoder New Preset Effects Panel

Creating Ingest Preset

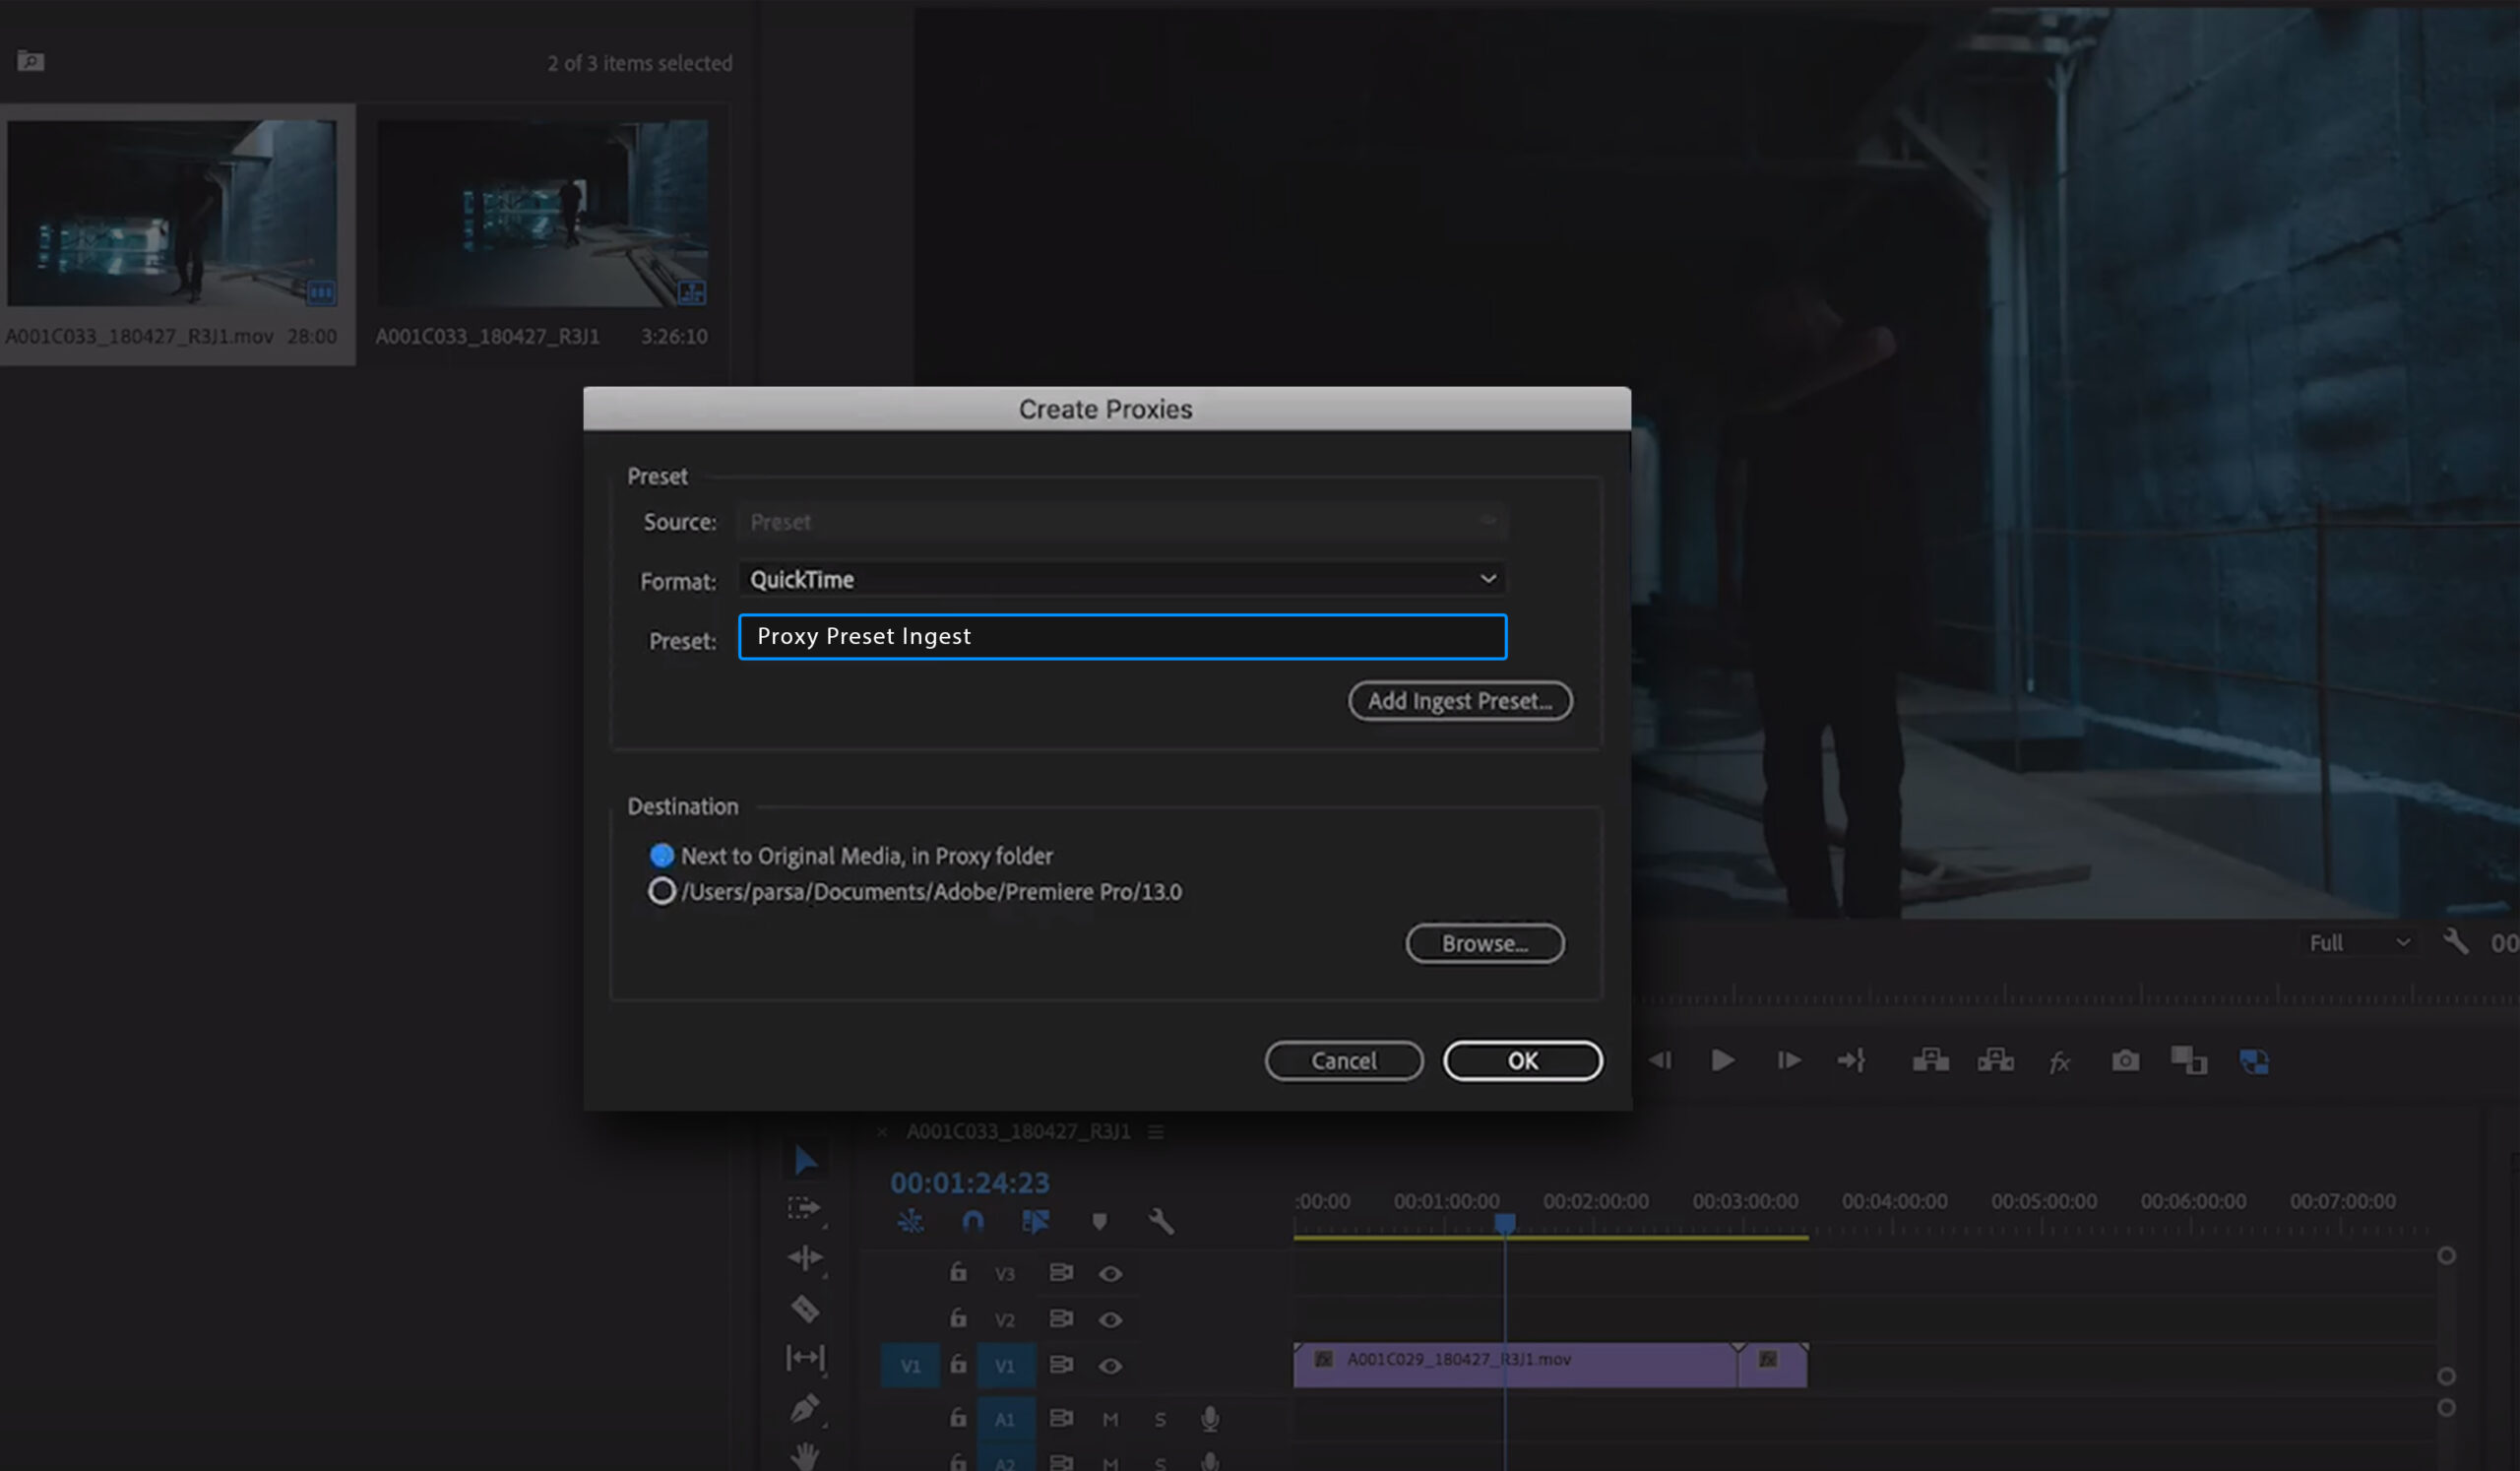
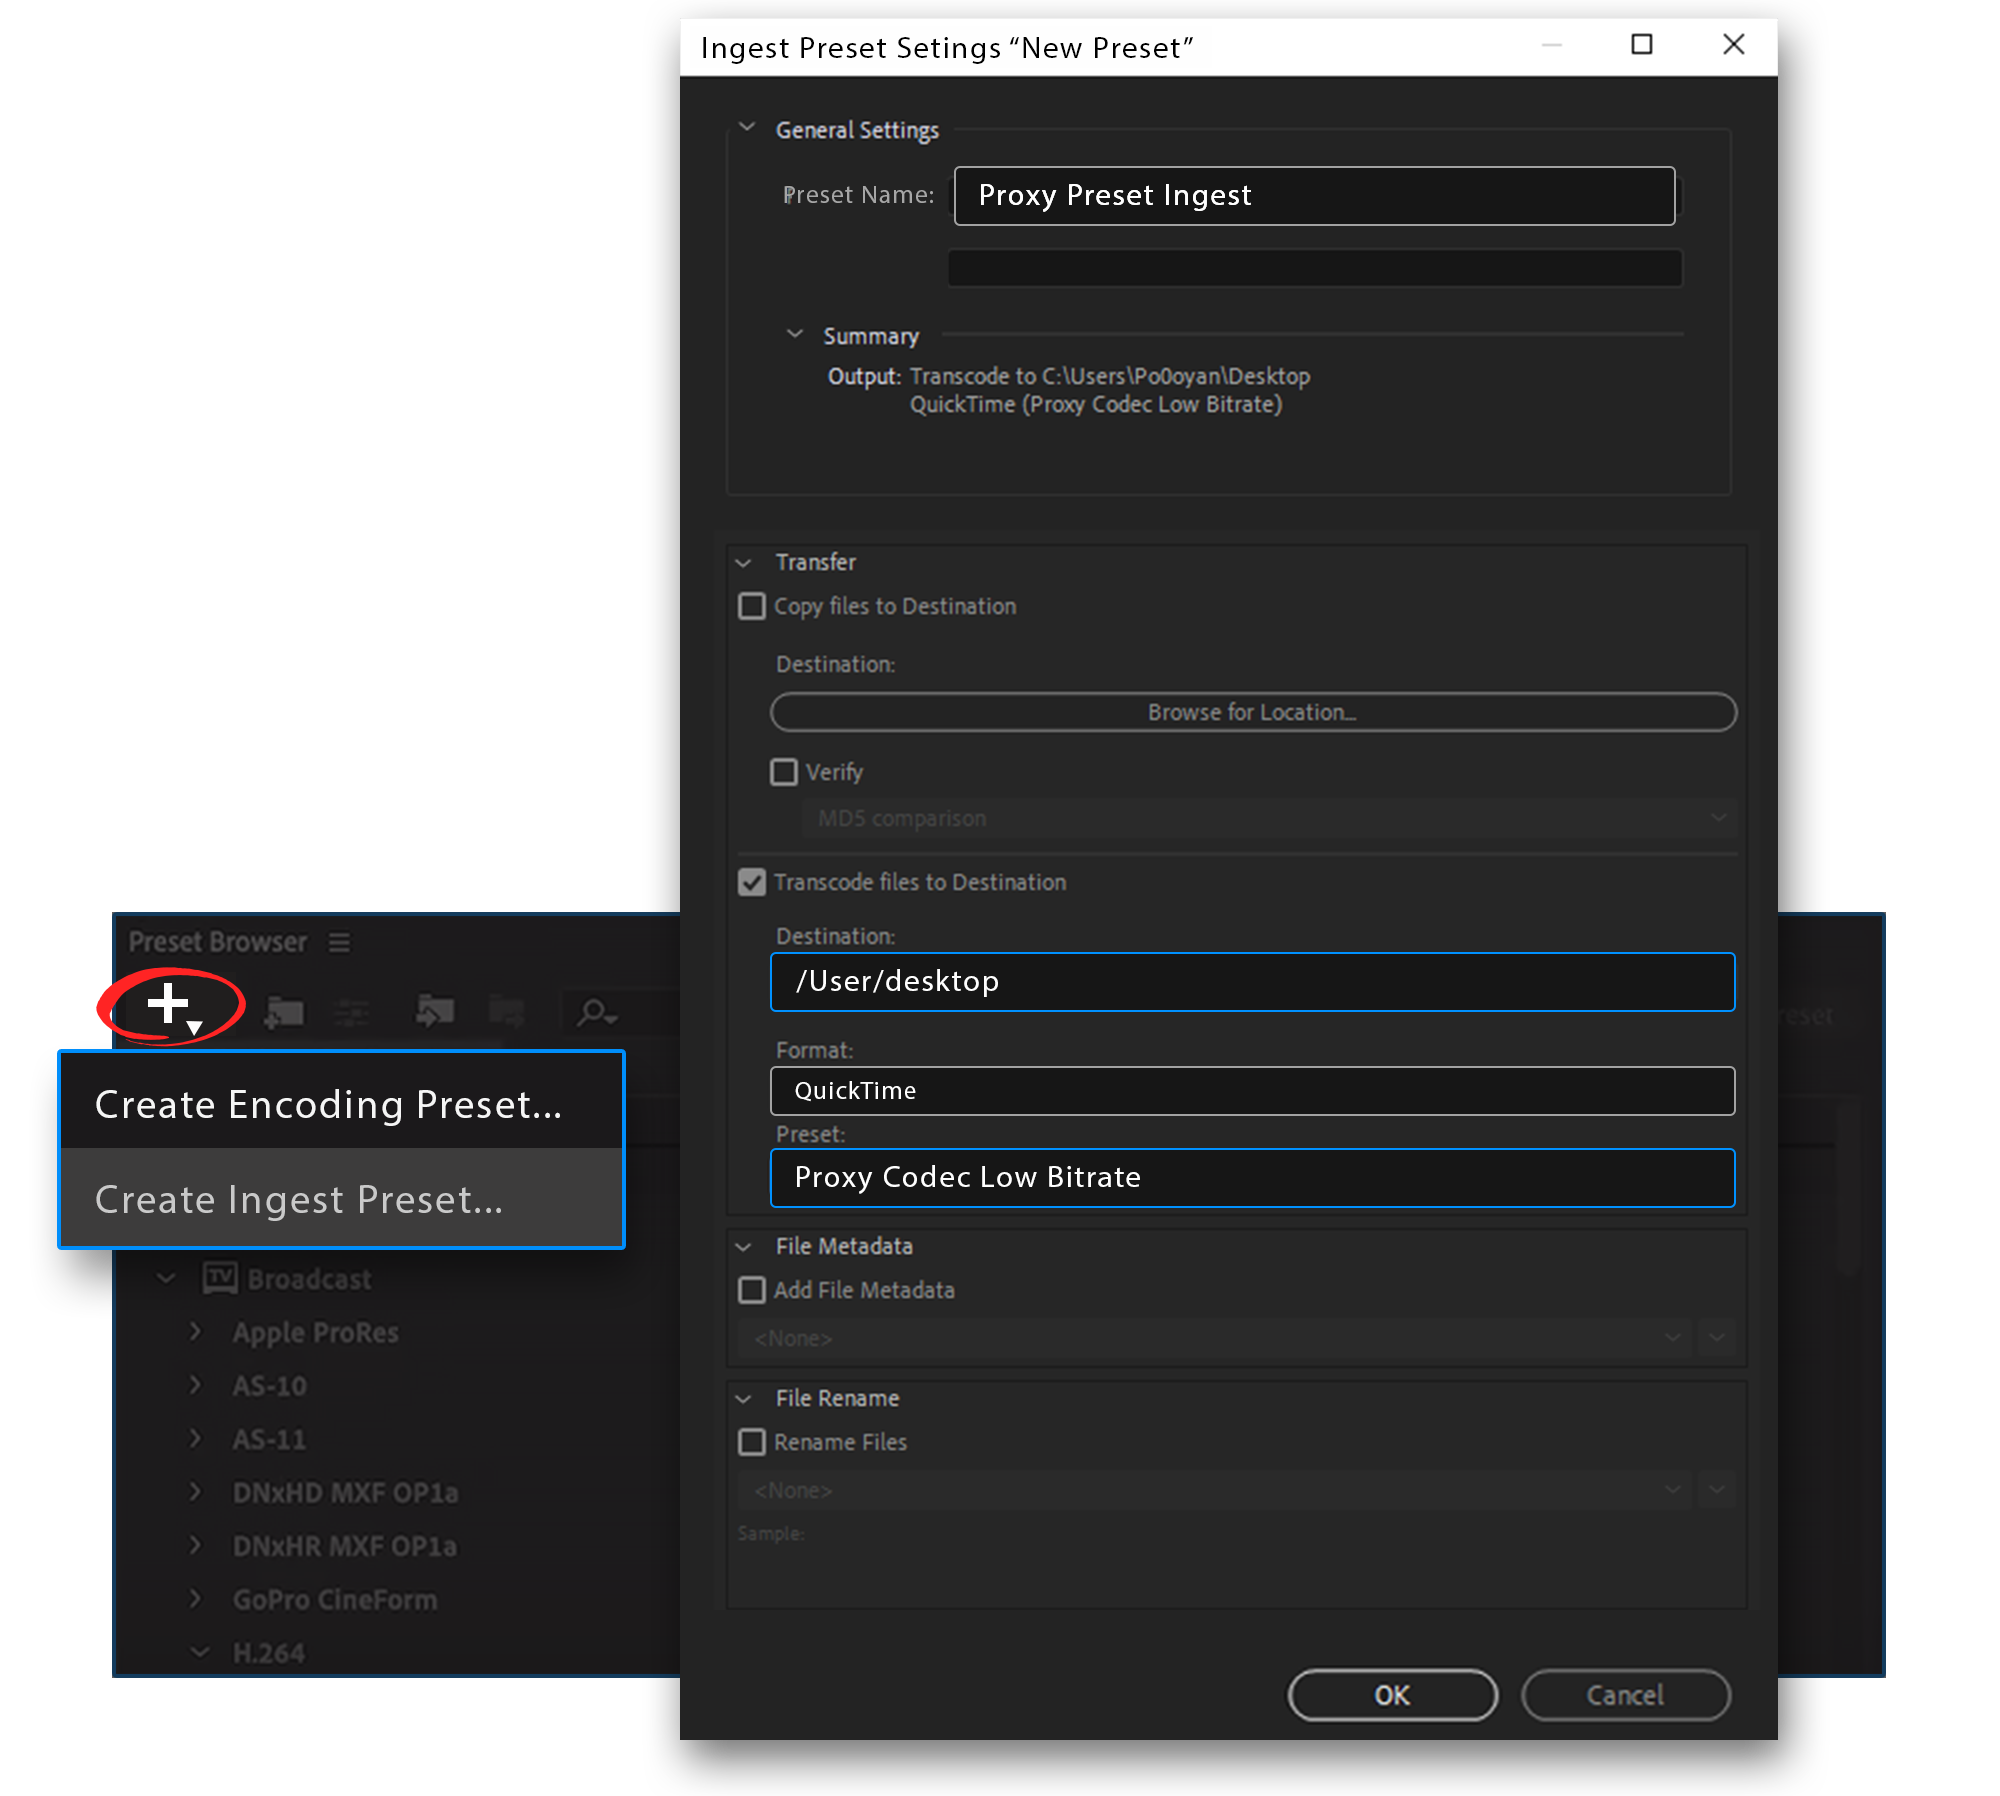
You can see the preset we have made here. Now we are going to click on the plus icon again and choose Create Ingest Preset. We will name it Proxy Preset Ingest. In the “Transcode Files to Destination” section, change the destination to the folder you have created for this matter. Now choose the preset you have created and QuickTime as the format.

You can organize the name of the files you are transcoding in the File Rename section. I personally never use this option because I prefer to keep the name of my original files and the name of the proxy ones the same. This will help find what you are looking for much faster.

Also, if you are looking for the source of the preset files, you can Right-Click the Preset and choose Reveal Preset. You can also share the files with others and things like that.

4k video editing using proxy premiere pro ingest preset
Media Encoder Creating Ingest Preset

Back To Premiere Pro

Select your footage, right-click, Proxy, Create Proxies. Then click Add Ingest File and choose the created preset from source files.

This preset you have created will always be here for you to use unless you decide to make any changes to it. You can choose next to original media in the proxy folder as your destination to have your proxies next to your original footage. The other option is the destination you choose in the encoder. You can keep all your proxies and projects in a single folder for better organization.

You can see by keeping on doing this, all the footage will be automatically added to the encoder and then convert to the format you have chosen.

4k video editing create proxy premiere pro
Setting Proxy in Premiere Pro

Switching To Proxy Form

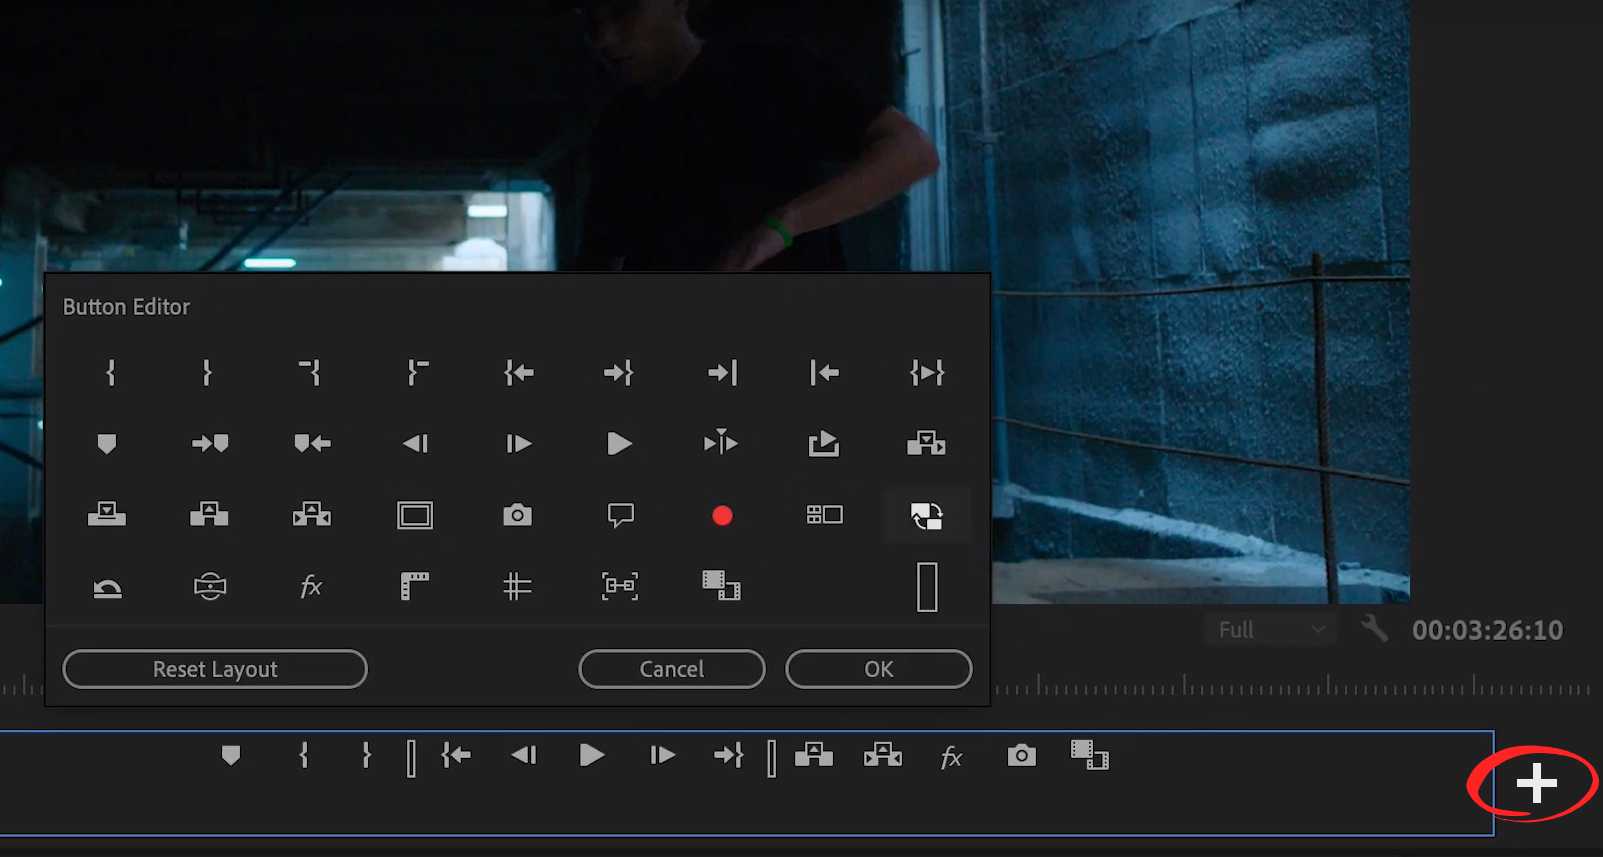
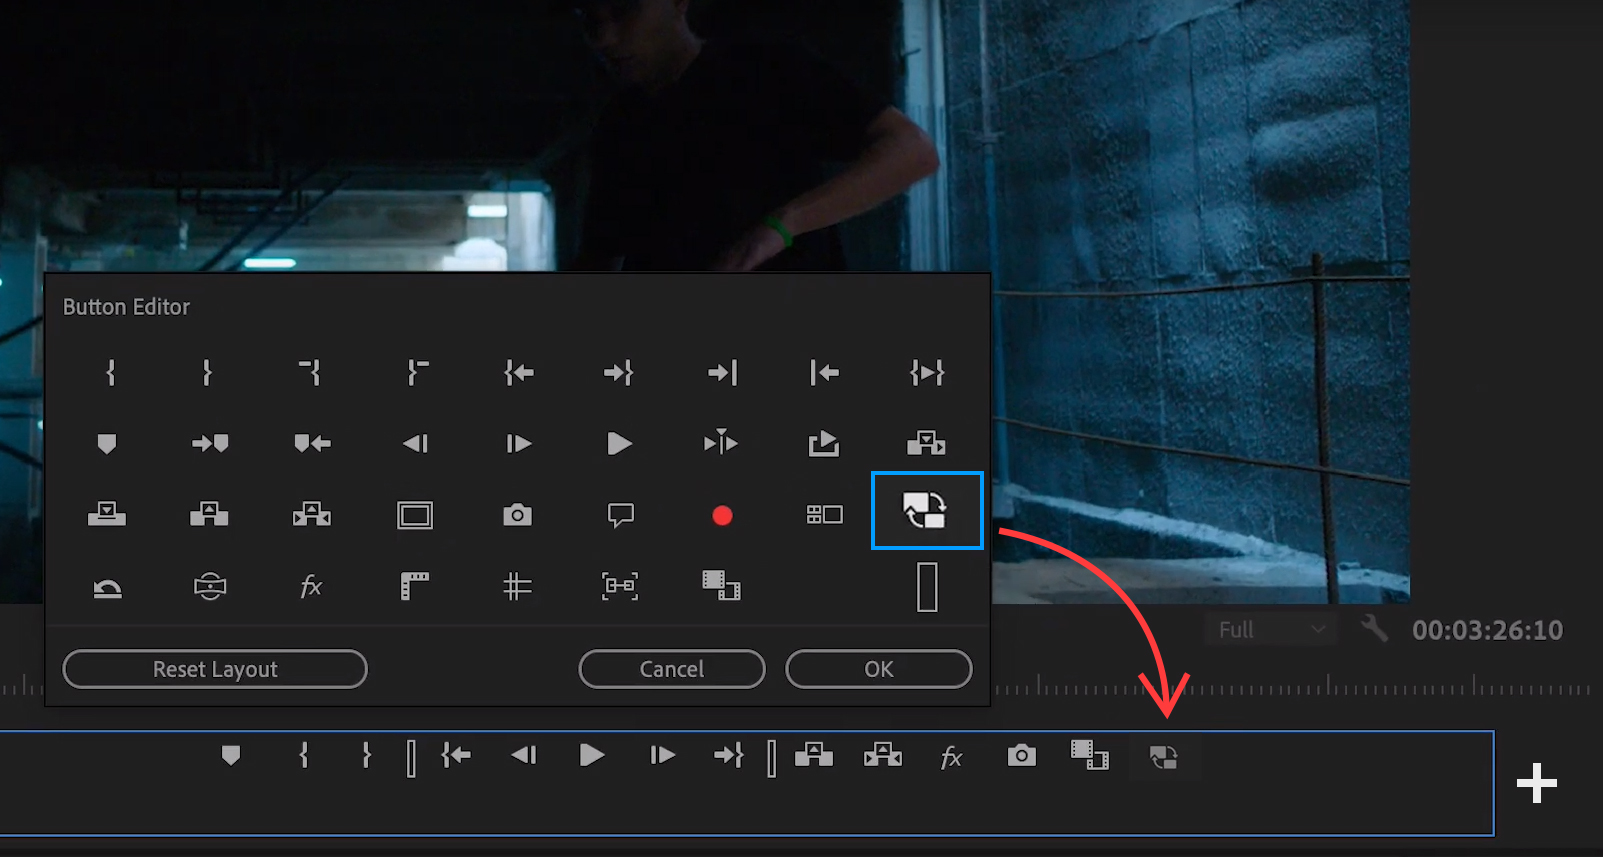
After all is done, go back inside premiere and what you will see is that all the footage is still in original form. So, Click on the plus button at the bottom right corner of the Program Panel, the one that is showing the preview of your footage, to see all the hidden tools. Add Toggle Proxy to your main tools and hit OK.
4k video editing proxy premiere pro switch button
Adding Proxy Switch Button
4k video editing proxy premiere pro switch button
Adding Proxy Switch Button
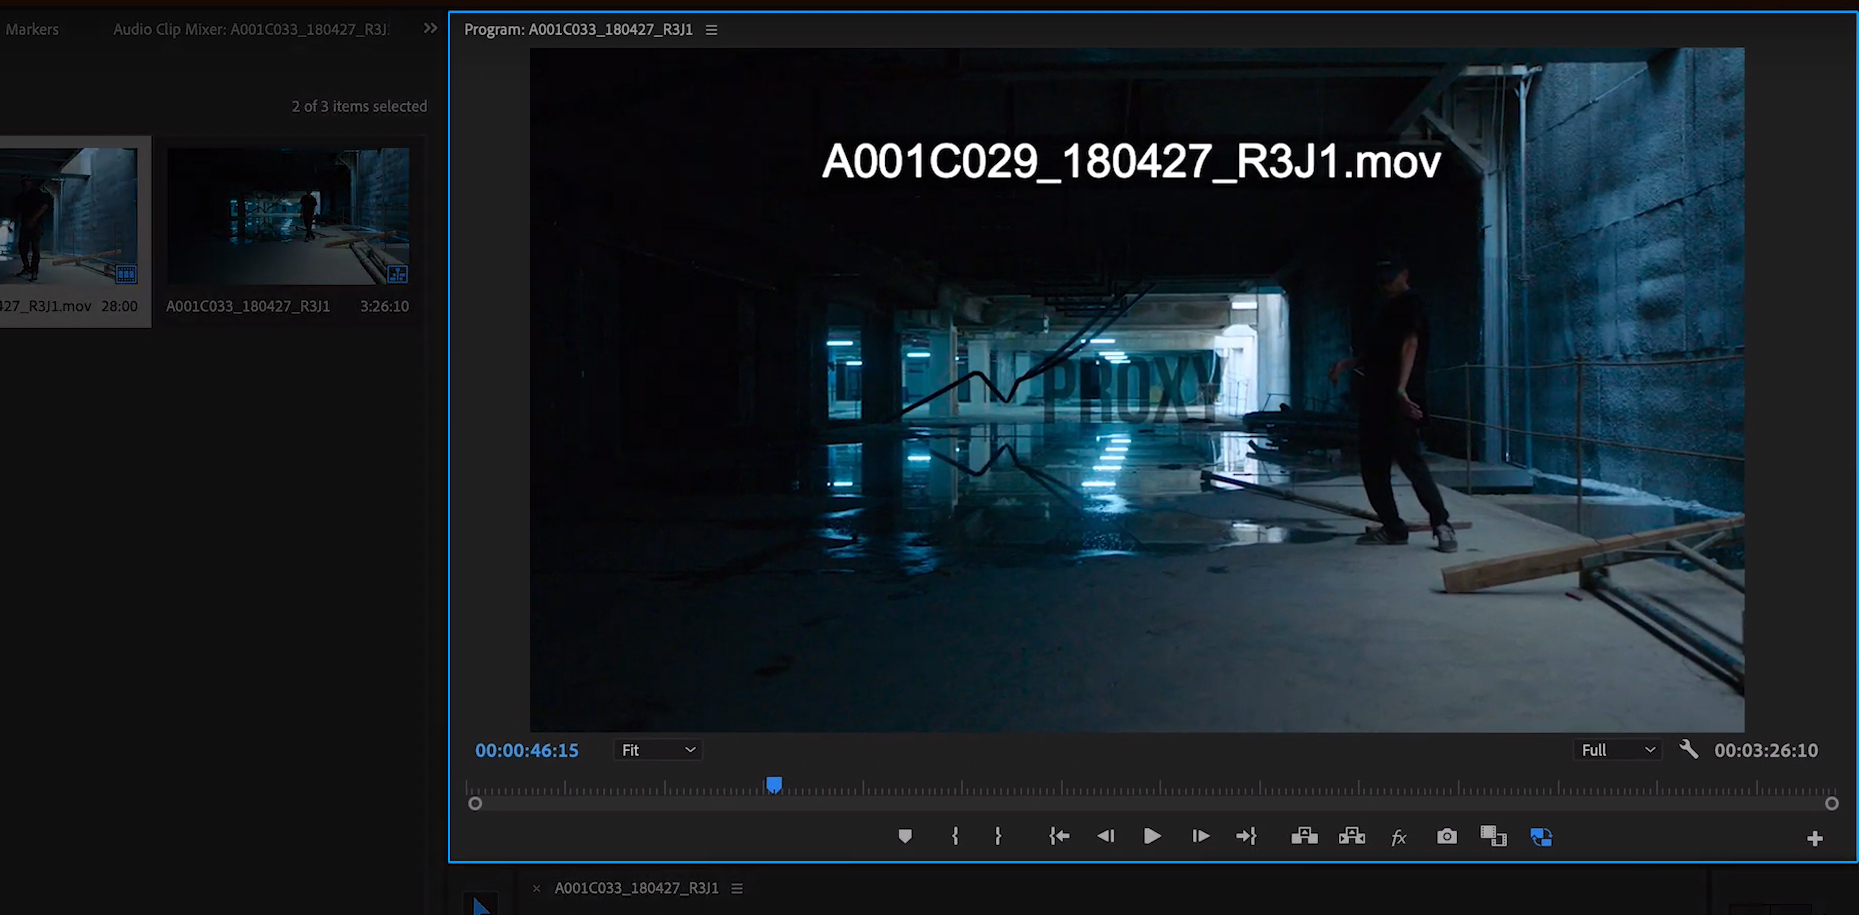
You can now switch between Proxy and Original mode by just clicking on this button. If you are on a rather slow laptop, you can be in proxy mode during the editing process and move back to the original form when doing the color correction. You can see that the Logo or the image you have added is just there when you are in proxy mode. That also applies to the watermark you did add. You can also have the timecode inside the proxy if you fancy that. You can easily see how everything is much smoother now.
4k video editing proxy premiere pro
4k Video Editing Using Proxy in Premiere Pro
Be ready for an amazing editing experience! And whenever you feel you need access to the original footage, all you have to do is clicking on this button.

0 0 votes
Article Rating
Subscribe
Notify of
guest
0 Comments
Inline Feedbacks
View all comments