Video noise and grain can be one of the biggest bummers to any content creator. Noise happens especially when you are shooting in a situation where the lighting is not optimal and to compensate for that you have to crank up your ISO settings. The way ISO works is that it will increase the sensitivity of your camera sensor to light which will also escalate the amount of noise your sensor will capture. That’s when you begin to see some grain in your footage especially around shadowy portions of your video clip.
So what is the solution? Well, for now, there is no native solution built inside adobe premiere pro so we should rely on third-party plugins to save us. And fortunately, there are some good ones out there! For example “Neat Video” and Red Giants “Denoiser” are among the ones that are extremely popular.
Video Noise and Grain Differences
Before we dive into the noise reduction effect details, it’s essential to understand the difference between video noise and grain, as well as their causes:
Video Noise: Unwanted noise in video clip is typically caused by electronic interference or low-light conditions. It manifests as random, unwanted pixels or specks of color or sound that appear across the footage, giving it a grainy or static-like appearance.
Video Grain: On the other hand, grainy videos are natural byproducts of analog film stock. It appears as a finely textured pattern of tiny dots or particles, lending a distinct aesthetic to the footage. While some filmmakers intentionally embrace grain for its cinematic look, excessive grain can be distracting and detract from the overall quality.
Denoiser III
For this post, I have decided to focus on Red Giant’s Denoiser III. Adobe Premiere Pro offers a dedicated Noise Reduction effect to combat video and audio track noise. Here’s how to use it:
- Go to your Effects panel and search for “Denoiser”.
- Drag and Drop on it to your footage.
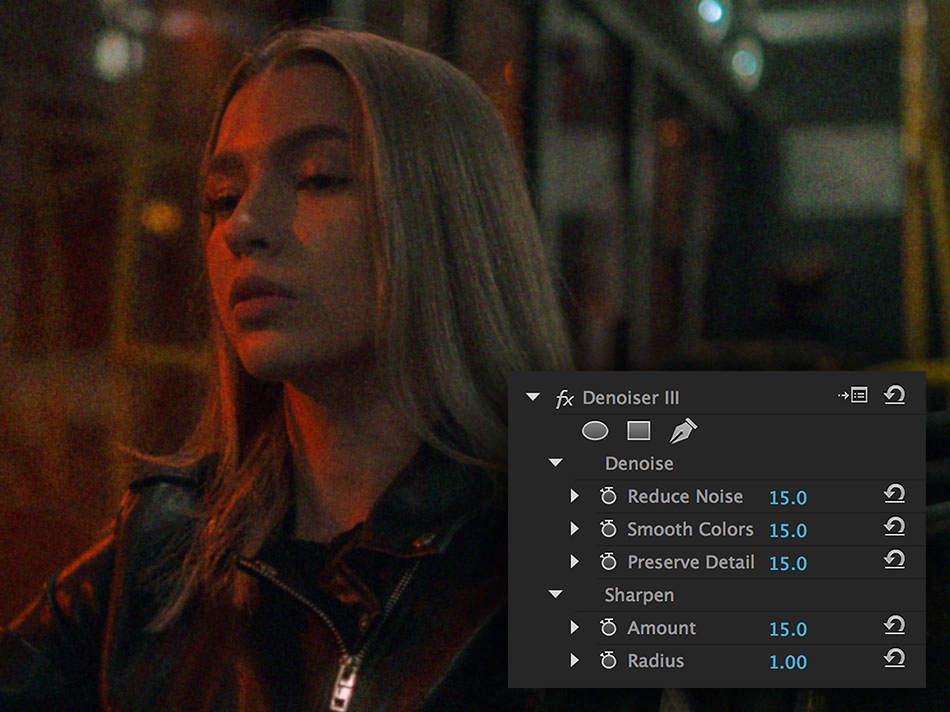
- Check the Effects Control panel and there you can find it. There exist two main sections, Denoise, which is obvious what it does, and Sharpen which I will talk about in a moment.
- By default, the noise reduction premiere default settings sits at 15. But in most cases, you need to move to the right to increase the intensity of the effect.
Pro Tip: Be careful, this is not like Coco where always more is better. Since the main method of plugins is to analyze the pixels and then blend them with noise, using too much noise reduction means blurry and soft footage. So make sure you use the plugin in moderation.

More settings to remove background noise
- “Smooth Colors” is the next slider that will find color noise in the video and tries to blend it with the other pixels and make the video look much better. It always feels like it makes the picture look better and sharper.
- The next slider is “Preserve Detail“. This one really tries hard to keep the video clip sharp and crispy, and in most cases it is successful.
- The other section, “Sharpen“, is what I personally seldom use. It is totally a taste thing but sharpening, in general, is not my cup of tea. Of course, there are instances that sharpening works like a charm, but again in those instances, you should be really careful about the amount of sharpening you are adding. Because remember, sharpening will sharpen everything in the footage. So, my suggestion is that if you want to sharpen, use both the sliders and work with them.
- Try to keep the “Radius” low. As the name implies, the radius will define the area size the effect is going to process. So keeping it low will make it a bit more precise.

The Warp Stabilizer Effect
While primarily a tool designed for stabilizing shaky footage, the Warp Stabilizer effect in Premiere Pro can also help reduce unwanted background noise and grain.
-
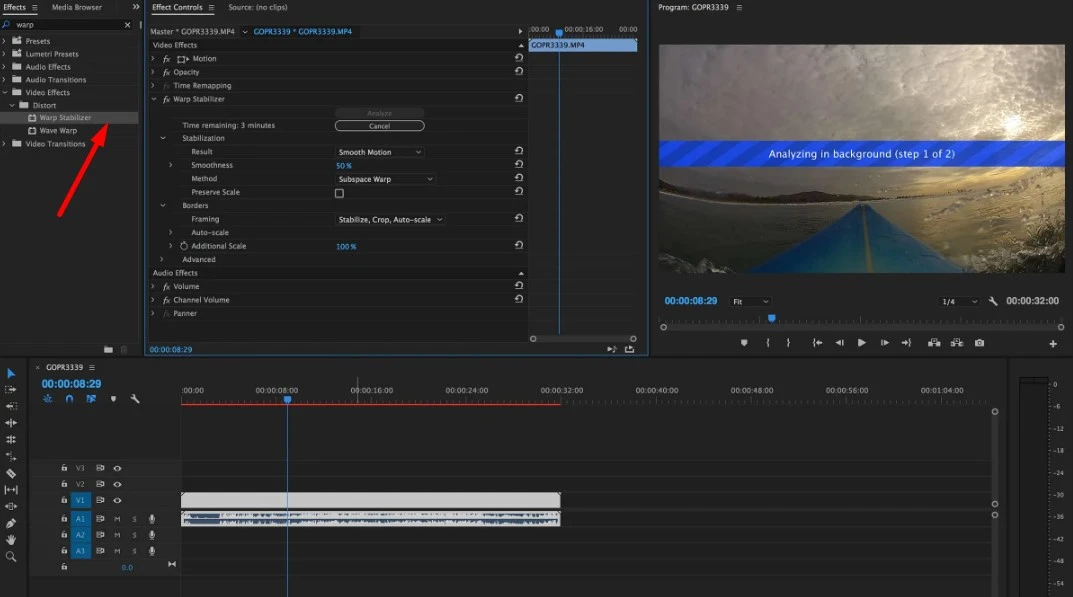
Follow the same steps as above, but search for and apply the “Warp Stabilizer” effect instead.
Adjusting the Warp Stabilizer Settings
- In the Effect Controls panel, expand the Warp Stabilizer effect properties.
- Increase the “Smoothness” setting to enhance the noise reduction capabilities of the effect.
- Adjust the “Method” setting to choose between different stabilization algorithms to reduce noise in video editing process.
- Experiment with the “Detailed Analysis” and “Borders” settings to fine-tune the results.
Pro Tip: The Warp Stabilizer effect is computationally intensive, so use it judiciously, especially on longer clips or projects with limited processing power.
The Gaussian Blur Effect
While video noise is typically undesirable, some filmmakers may want to retain the natural grain of their footage for aesthetic purposes. In such cases, selectively reducing excessive grain in video files can be beneficial. A simple yet effective way to get rid of video grain is by applying a slight Gaussian Blur to your footage.
-
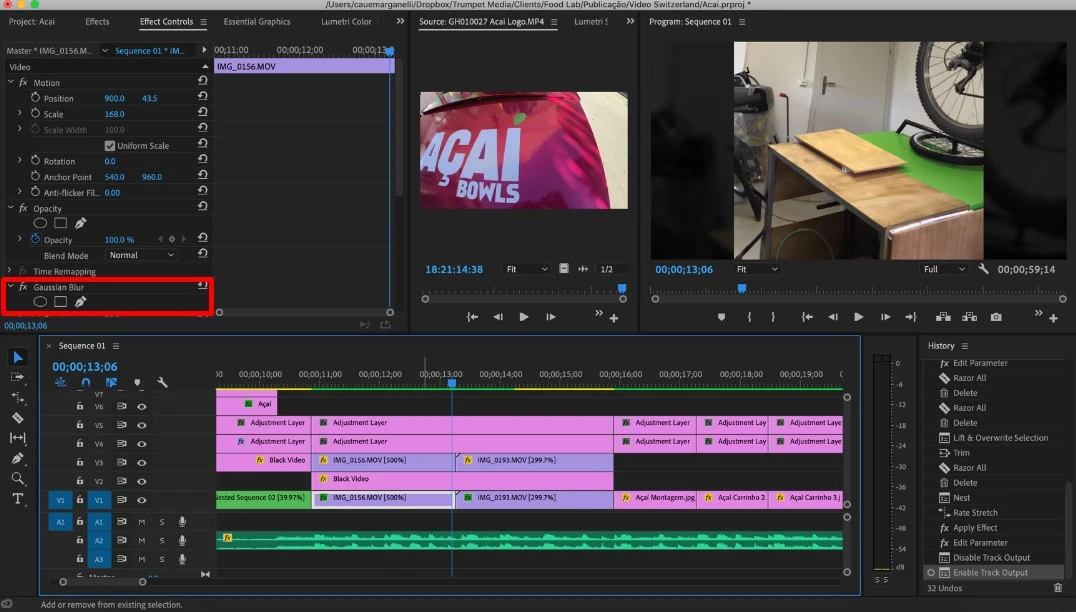
Follow the same steps as above, but search for and apply the “Gaussian Blur” effect.
Adjusting the Gaussian Blur Settings
-
In the Effect Controls panel, expand the Gaussian Blur effect properties.
-
Adjust the “Blurriness” slider to control the amount of blur applied. Start with a low value and gradually increase it until the grain is reduced to your desired level.
-
Experiment with the “Blur Dimensions” settings to control the direction and intensity of the blur.
Pro Tip: While the Gaussian Blur effect can effectively reduce grain, be cautious not to overdo it, as excessive background blurring can result in a loss of detail and sharpness.
The Sharpen Effect
Counterintuitively, using the Sharpen effect in moderation can also help reducing noise.
-
Follow the same steps as above, but search for and apply the “Sharpen” effect.
Adjusting the Sharpen Settings
-
In the Effect Controls panel, expand the Sharpen effect properties.
-
Adjust the “Amount” slider to control the intensity of the sharpening effect. Start with a low value and gradually increase it until the grain is minimized without introducing excessive artifacts or halos.
-
Experiment with the “Radius” and “Chroma” settings to fine-tune the sharpening algorithm.
Pro Tip: Combine the Sharpen effect with a slight Gaussian Blur for a balanced approach to grain reduction, preserving detail while minimizing artifacts.
Advanced Techniques
Here are two other methods which are proved to be very helpful.
Creating a Denoise Adjustment Layer
For more precise control to remove grain, consider creating video file with a dedicated Denoise Adjustment Layer:
-
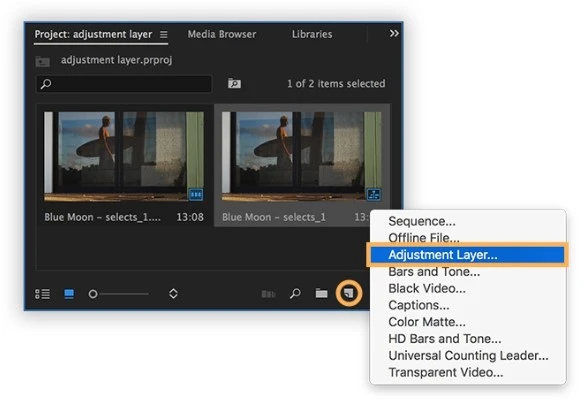
In the Project panel, right-click and select “New Item” > “Adjustment Layer.”
-
Drag the Adjustment Layer to the Timeline, positioning it above the clips you want to denoise.
-
Apply the desired noise reduction effects (e.g., Noise Reduction, Warp Stabilizer, Gaussian Blur) to the Adjustment Layer.
-
Use the Adjustment Layer’s opacity and blending modes to fine-tune the intensity of the noise reduction.
Combining Multiple Techniques
For particularly challenging footage, consider combining multiple noise reduction techniques for optimal results. Example Workflow:
-
Apply the Noise Reduction effect to target general video noise.
-
Add a Gaussian Blur effect with a low blurriness value to get rid of grain.
-
Follow up with a Sharpen effect to restore lost detail and sharpness.
-
Experiment with effect order and settings until you achieve the desired balance of noise/grain reduction and sharpness.
Conclusion
One of the strong suits of Denoiser is its light nature. Of course, other software plugins, like Neat Video may do a better job, but they are much more taxing on your system and workflow.
Remember, grain and noise reduction is an art form that requires a delicate balance between minimizing unwanted artifacts and preserving the desired aesthetic and detail. Experiment with different approaches, be patient, and don’t be afraid to seek inspiration from tutorials and professional resources. With practice and the right techniques, you’ll be able to create visually stunning, noise-free videos that captivate your audience and showcase your creativity to the fullest.
OK, thank you for sticking with me to the end! Be sure to leave your comments down in the comments section. Until the next time, best of luck and bye!

