Exporting your project can be considered one of the most important steps of your editing process. All the work you put into your project, all the time you have spent on it will boil down to what comes out of your export window. So mastering it is as important as the whole editing process. In the text that follows we will discuss in detail all of the exporting settings inside Adobe Premiere Pro export panel. let’s see what is up!
In order to get Export from Premiere Pro, you should:
-
Find Export from the header bar. You can also go to exporting panel: File ~> Export ~> Media or press Ctrl + M (Command + M on Mac)
-
Type your file name and choose your preferred location.
-
Choose your file format and the preset for it. H.264 and QuickTime are the most popular formats.
-
Select the best export settings (full explanation in the rest of the article)
-
Click Export and Done!
Export Settings
First of all, in order to get to your exporting panel, you need to go to File ~> Export ~> Media or press Ctrl + M (Command + M on Mac).
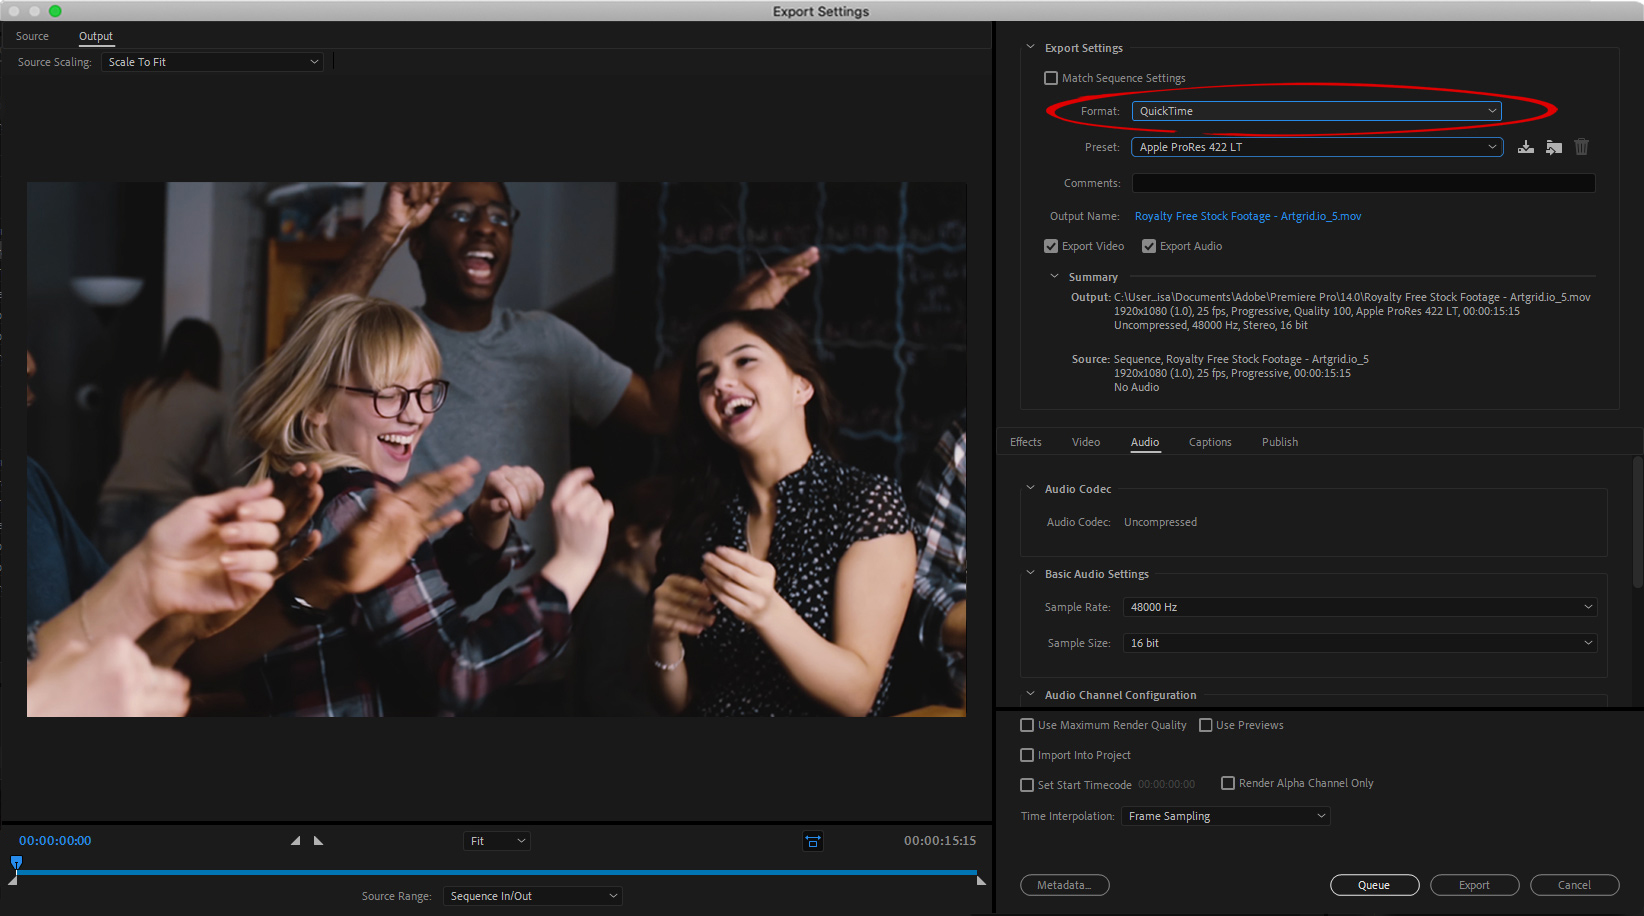
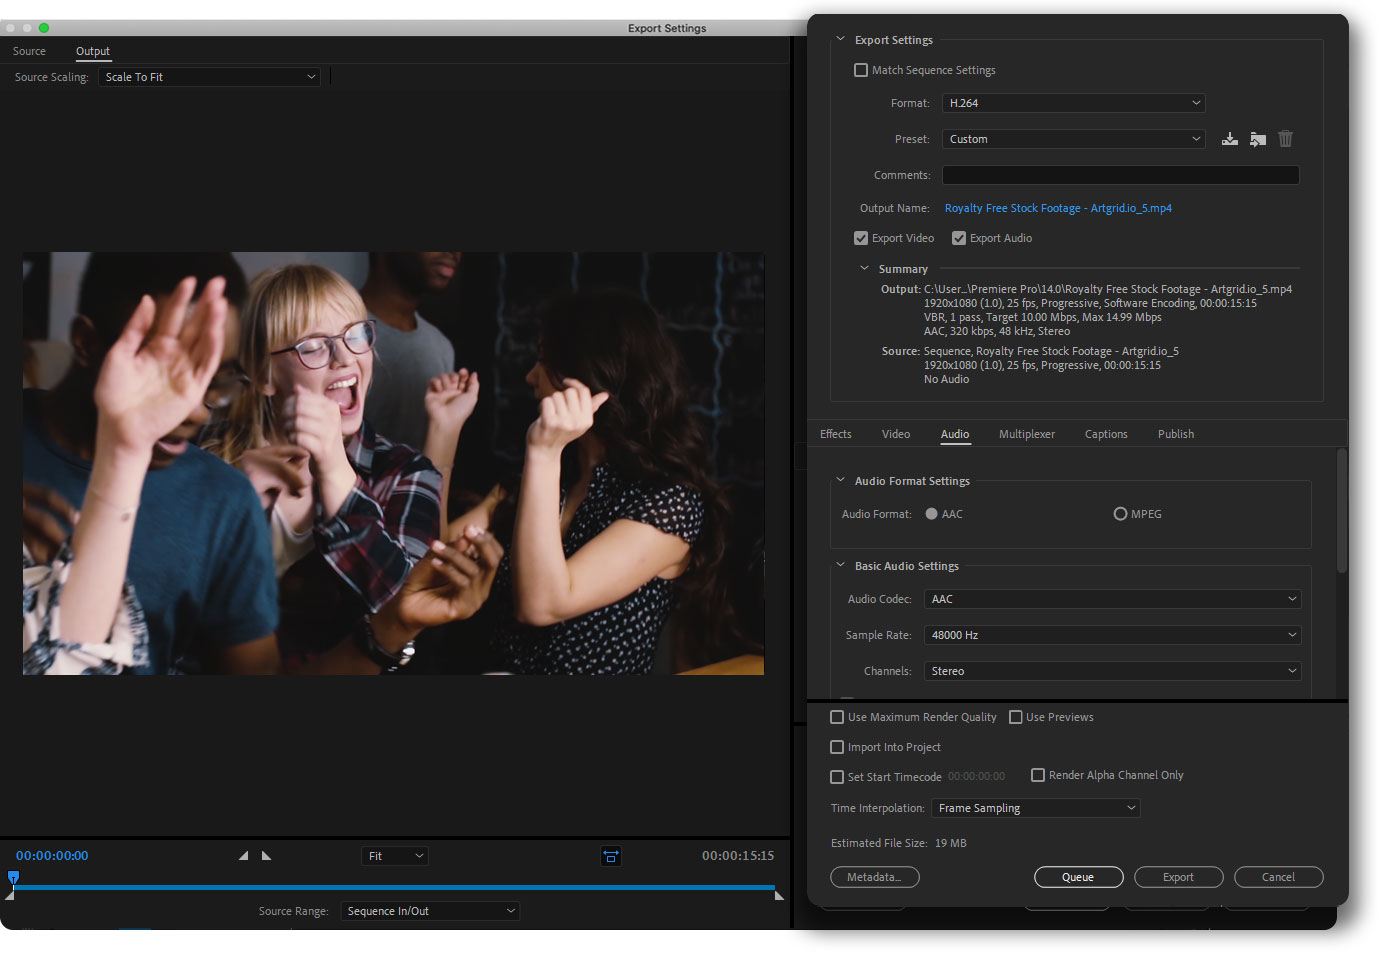
Here you can see the the export panel with all of its goodies! It may look a bit overwhelming at first but when you get to know what is what, it is actually really easy to work with.
Format; What are H.264 and QuickTime?
Here you will choose your file format and the preset for it. H.264 and QuickTime are the most popular formats.
H.264 is supported on so many devices and platforms and also it is a good balance between file size and image quality. If your intention for your video is to distribute them on the internet, H.264 is going to be your best friend.
QuickTime on the other hand is more popular for its less compressed files but that means bigger file sizes. So it is more popular as an intermediate codec for passing around between editors when they want to move files before final exporting.
Presets
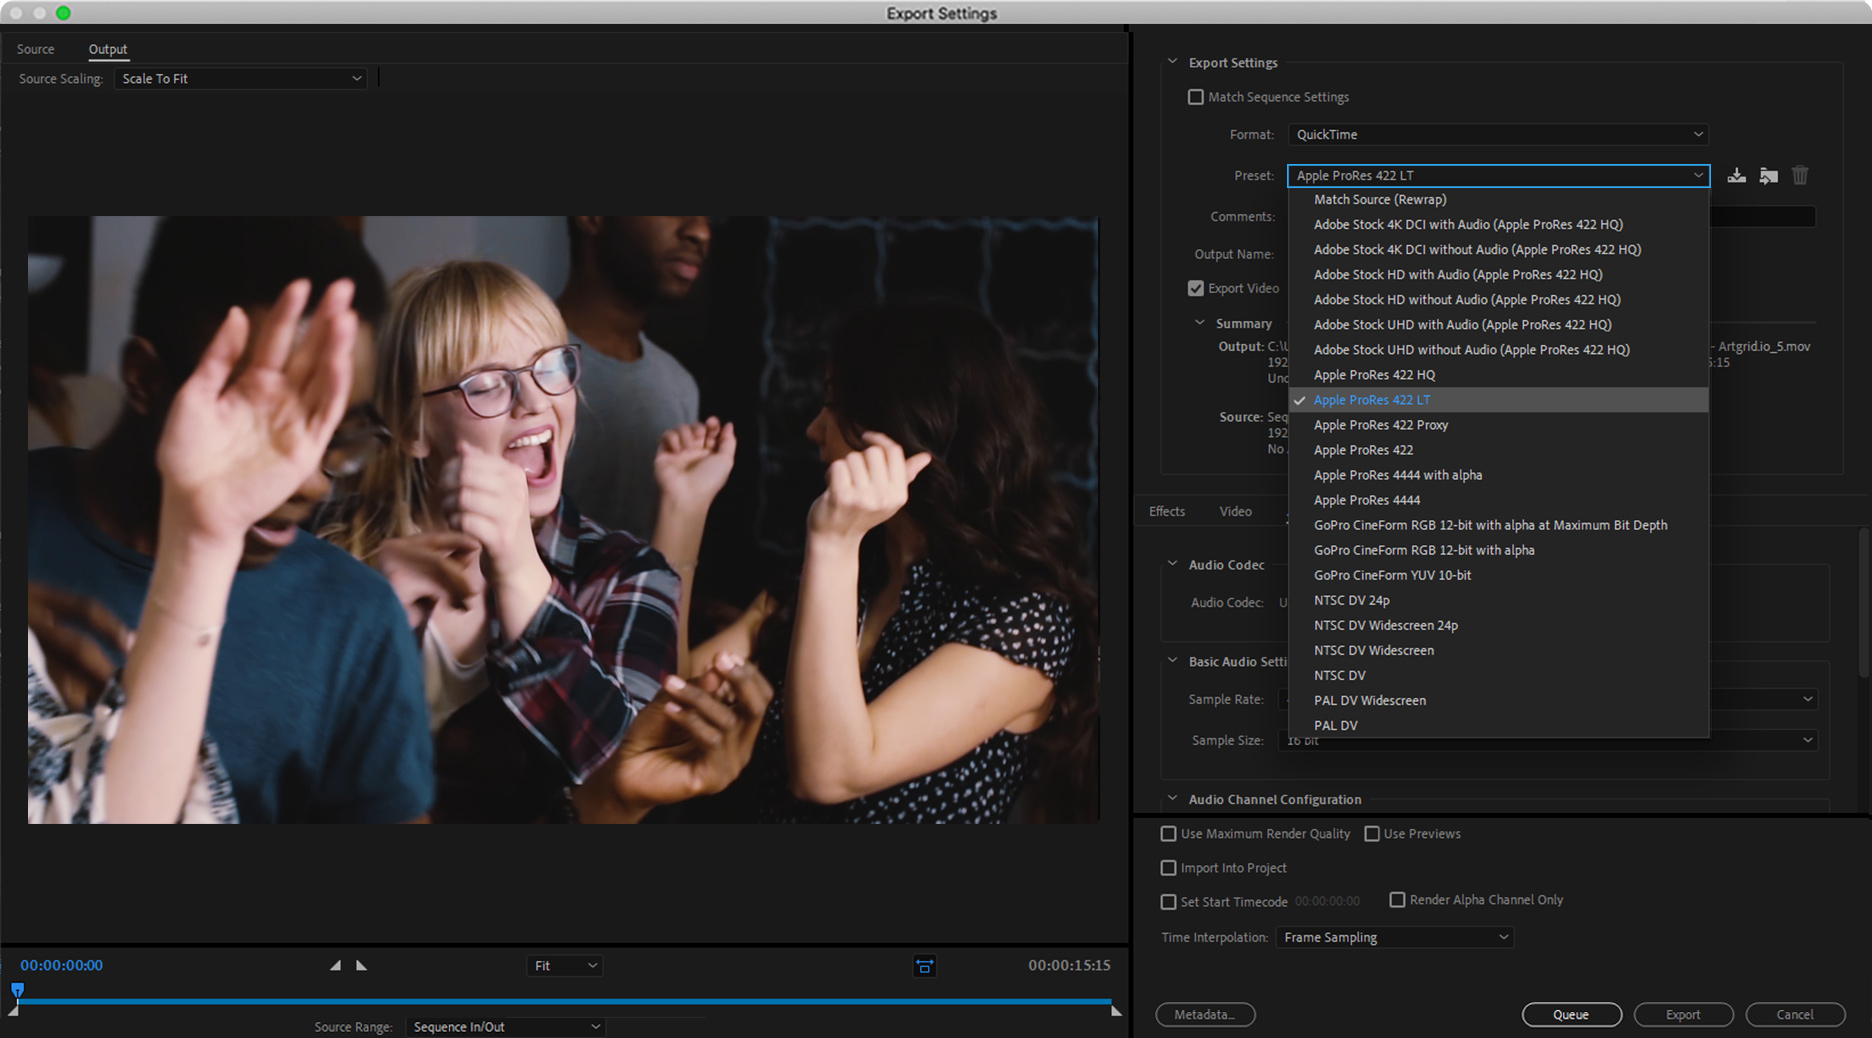
Inside preset section you will have so many options to choose from. Of course each format has its own presets, for example in the case of H.264 you can see some familiar names like Vimeo and YouTube. If you are just about simply uploading exported video to social media then these presets can be really helpful.
If you go the QuickTime route, you see some presets which are not that familiar, in fact they may look a bit scary and technical! I personally always use Apple ProRes 422 LT but of course you can change everything down here if you fancy. For example DNxHR/DNxHD is Avid’s answer to Apple’s ProRes and they are both amazing.
The biggest difference is that ProRes is geared more toward apple users and DNxHD is more of a windows thing
But all that said, if you want to have more control over your end product and get a better suited end result, you should try to customize everything to your liking. After all, you gotta take care of your videos!
OK, we will get to the customization stuff in a bit but before that, let’s talk about this little option here. This is the name of your output file and clicking on it will give you the option to not only change the name of the output file but also set the destination for it.
Oh and since we are here, DO NOT FORGET to make sure both Export Video and Export Audio are checked! It may sound obvious but I have forgotten it before and it was not a good experience!
Export Summary; very useful
Anyway, let’s check this VERY useful section here named “summary”. Here you can see some useful info about both the current file and what it is going to become. This panel can single handedly save you a lot of time by giving you all the info you need about what you are actually doing to your source material.
And I believe a complimentary thing for that can be this part down here which will tell you an estimation of the file size to be. Just keep in mind that it is just an estimation and not a precise number.
OK, moving further down you can see all these tabs. Can be a bit confusing but to be honest the ones that you will really need to master are Video and Audio. Don’t worry about the rest, I personally almost never even check them!
Basic Video Exports Setting
So let’s start with Video tab which as the name implies, consists of all the essential video settings.
First I have to mention that all the options in these tabs are dynamic and change based on the format you choose. For example if I change my format from H.264 to QuickTime you will see Video Codec option will be added here. So keep that in mind. But for the sake of this video I’m gonna stick with the vastly more popular H.264 format.
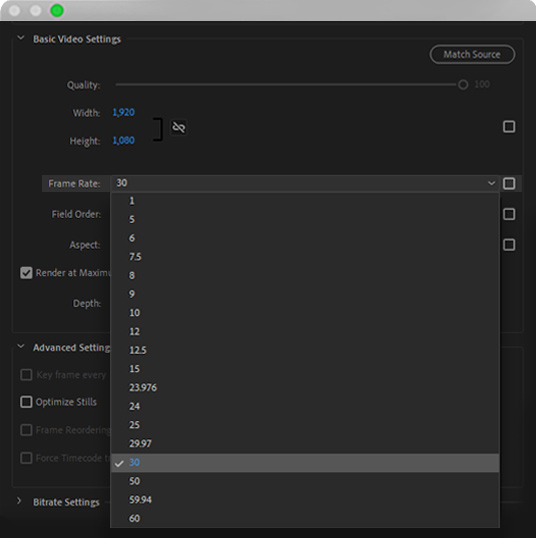
Anyway, all these option here can be changed based on your needs like changing the video frame rate and resolution. Now if you pay attention here you will see the moment I change anything, preset will change to Custom.
This means all the settings you are applying are now specific to you and the cool part is that by clicking on this button here you can save all the settings into a preset that is yours!
Let’s name mine Michaelomenia! But you don’t do that. First the name is mine and mine only, and second, a smart thing to do is to name your preset something that explains the inside settings. This can help you find what you look for faster in the future.
Read more in our Blog: How to remove Light Flicker in Premiere Pro
Resolution
Let’s get back to Video settings. As I said before, everything here is tweakable. Removing any of the markers will active the respective setting. For example here for the resolution, by default the width and height of the video are linked together by this switch and it is for the best to keep it that way but if for some reason you need to change the height and width independent of each other, you can do so by turning this link switch off.
Frame Rate
Frame Rate is the number of frames you see per second which will create the illusion of motion. The more frames means smoother video. But it is dependent on your taste and your work. For example MKBHD has been vocal about it in so many occasions that he prefers 30 frames to 60 frames because it looks more cinematic to him. 60 frames videos can sometimes create that Soap Opera feeling which depending on the situation may be good or bad.
If you ask my opinion, I would say if you are showing a video that has so many fast motions, or you are showing the stream of a video game, you better go 60 and up, but if your video content is for example a simple talk to the camera thing, 30 frames will be more than enough.
Field Order / Aspect
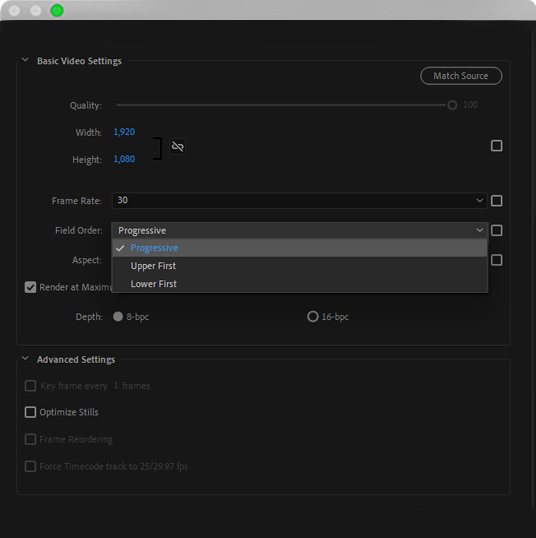
Field Order and Aspect are two other options you see here. You better to keep these as they are, just know that almost always aspect should be square pixels and field order should be progressive.
Finally, check Render at Maximum Depth to get the highest quality possible. This option will render your video at 32-bit color depth. It is extremely high but will come in handy when your video eventually goes through compression when being distributed.
Also as a reminder, I have to say that Rendering at Maximum Quality and Maximum Depth can take longer to finish, around 3 times longer in my experience. So you have to keep that in mind.
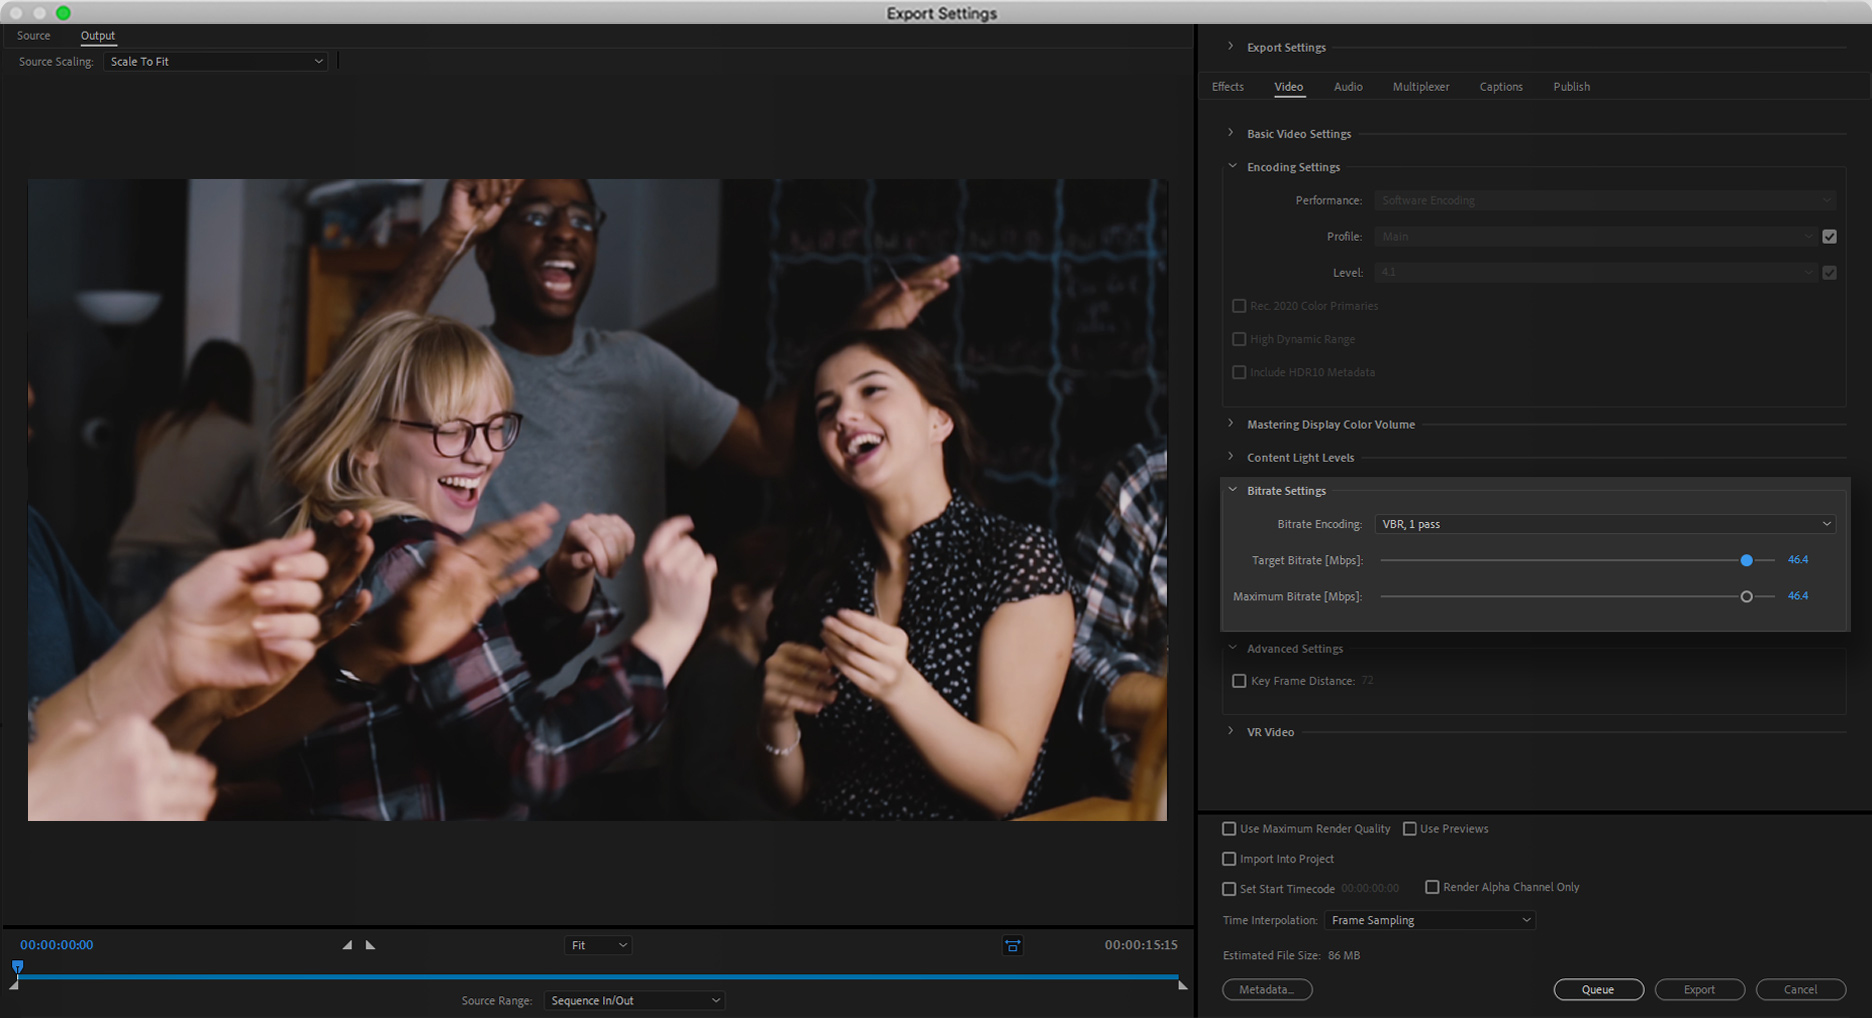
Encoding Setting
Let’s move on to the next section which is encoding. If you have a somewhat high end rig with a relatively new Core series Intel CPU, you should definitely choose hardware encoding, otherwise software encoding is your best bet.
Just as a disclaimer, I have to say that your mileage may vary when using Hardware Encoding. There are so many videos online either having an amazing experience with hardware encoding, or they have experienced next to nothing speed wise. I personally experienced the benefit of Hardware encoding, but I will make a dedicated video on this matter getting in depth with the topic.
OK, now Profile and Levels. These two are settings that dictate the many aspects of codec and quality for H.264. I personally never change these because they change automatically when I set the other settings. So let’s let them be!
Rec.2020 is a color range with a wide color gamut and if your footage is in UHD then checking this option will give you higher color range.
High Dynamic range, HDR for short, will give you a better picture by making a better balance between the dark and light areas of your footage. If your video is shot in HDR be sure to use this option.
Bitrate Settings
Now we reach the Bitrate settings section. Simply speaking, Bitrate defines the quality of your video by setting the available data for each second of the video, so the higher the bitrate it is, the video will be in higher quality, but again it will also increase the size of the video.
Finding a balance between the file size and file quality is something that is really dependant on the situation and your taste. But mostly situation. If you have a client or if you are uploading on social media, you should always keep those things in mind.
CBR or VBR?
Now when you click this drop down you will be presented with 3 options. CBR which stands for Constant BitRate. This option will keep every second of your video at a set bitrate. It will result in a higher quality video but the size will be massive. So if you are uploading to social media, like Youtube, you should keep that in mind.
I personally always use the VBR options which stands for Variable BitRate. This option will constantly change the bitrate of the video on different scenes based on the needed quality. For example a background of solid blue does not need a high bitrate to look good but in a fast paced scene the bitrate should go up. This will give you a relatively high quality video at a much lower size.
But as you can see there are two VBR options, 1 pass and 2 pass. The difference between the two is that the second one will double check the video for a better bitrate setting. But of course this means the video will be rendered two times and it will obviously take twice the time to finish.
But I always prefer the two pass option since it will always gives m+e be better result. Yea it will take longer but that means more time for coffee.
Target Bitrate
Now you can see these two sliders here. The first one, the target bitrate, will tell Premiere what bitrate is your goal for the whole video and while it is rendering, it will set the settings accordingly.
The second slider will tell the system what is the cap for bitrate so premiere will know the bitrate should not exceed this set number.
Try to experiment with these to reach a number that you feel is right for you. For youtube videos, a 4K video should be around 40 to 50 for better quality and also it is suggested to do the same for 1080p videos because those high bits will really help your quality when Youtube compress your video.
Keyframe Distance and VR Video
Now that we have reached here there are only two other options which are actually not that important. Keyframe distance is the number of references the H.264 encoder uses for compression, you better leave it as it is, the default is always good in this case. The other option is for VR videos which is not a common thing and unless you have shot a VR video, this option is not going to help you.
Audio Format Setting
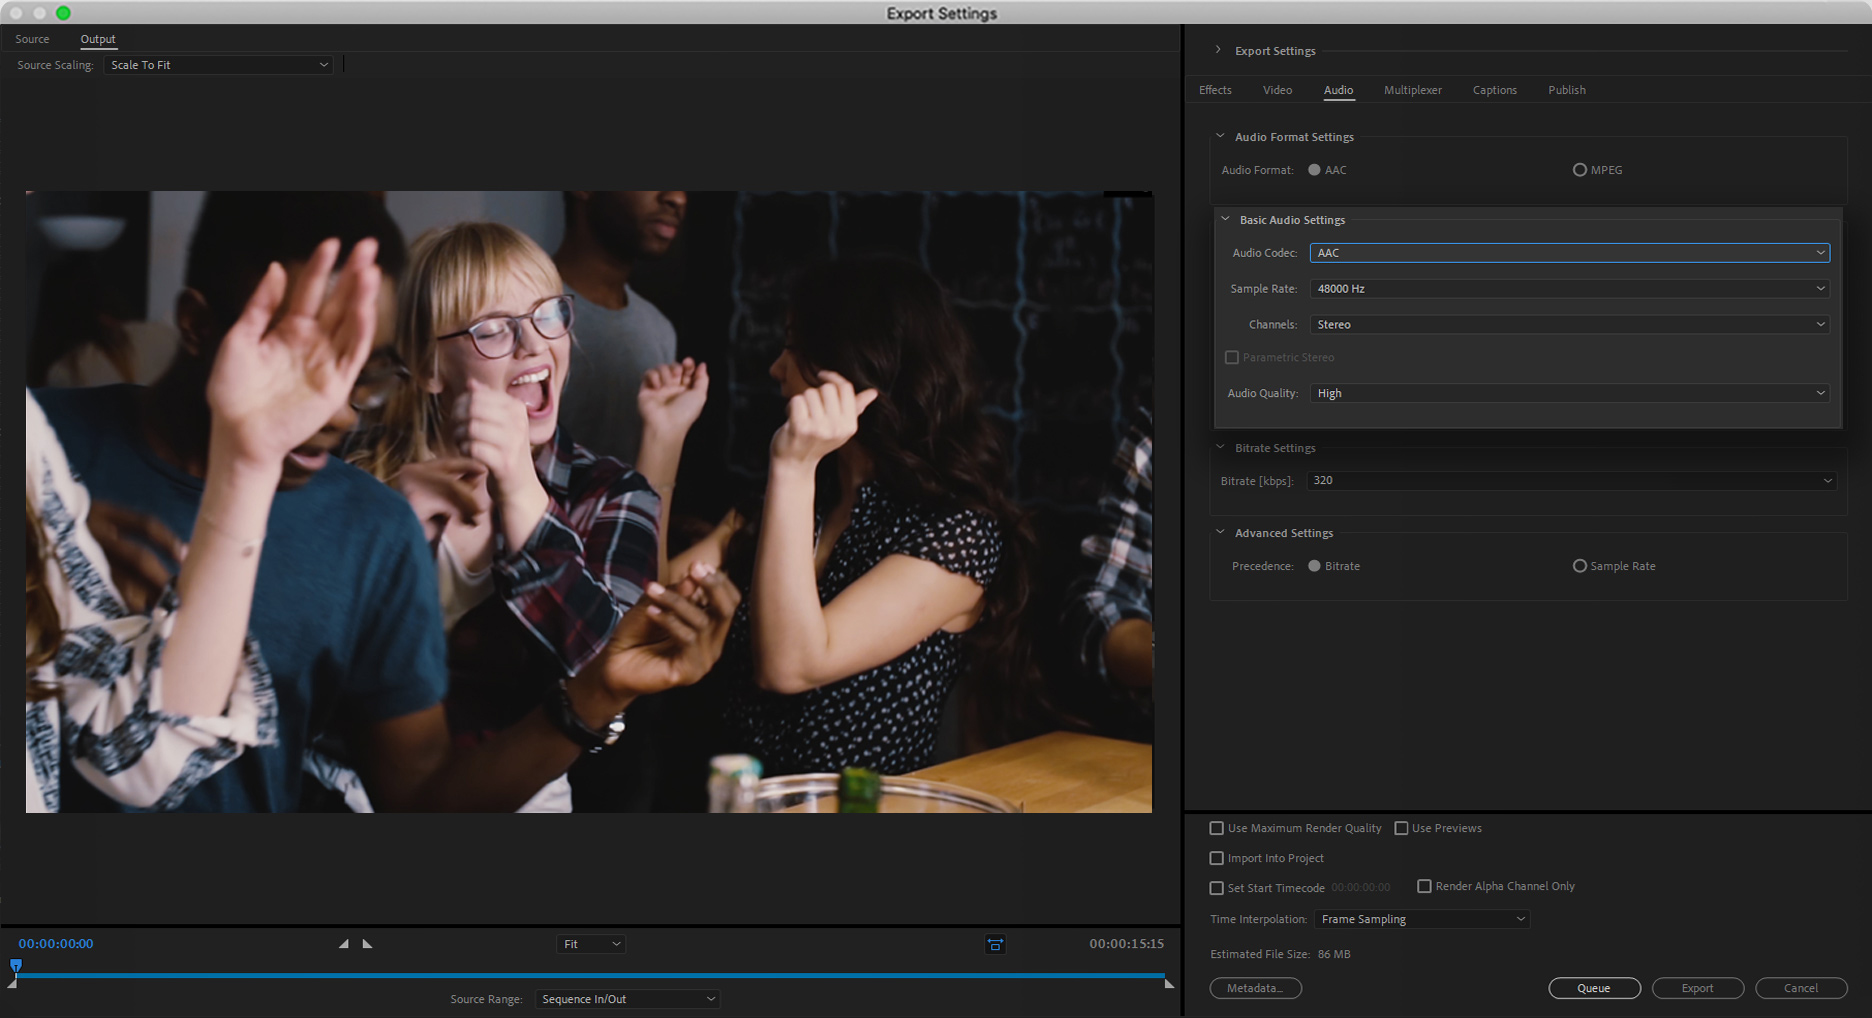
Now let’s move to the audio tab where almost everything is better left as default, which almost always is the highest quality. Since it is only audio, it will not affect the file size that much, so it is better to take advantage of all the highest settings. But for the sake of thoroughness, let’s talk about these options.
First of all, AAC vs MPEG. AAC is a part of MPEG format but unlike MPEG, it is solely focused on audio and because of that dedication it generally does a better job compressing the audio.
Audio Codec
When coming to Basic Audio Setting, the first option is Audio Codec. Dropping down the preset drop down menu, you will see these options and think version 1 and 2 are better than simple AAC but you are wrong! AAC version 1 and 2, more commonly known as HE AAC, HE stands for High Efficiency, are tailored for low bitrate audio, so if you are here for high quality audio, keep it at AAC.
Sample rate is all about audio frequencies and sound waves. It is a bit technical, but the short answer is the more the merrier!
Channel is simple, for general use stereo is amazing but if you want to go into the high end stuff, and you have recorded audio accordingly, feel free to use that 5.1 channel!
Oh and keep that Audio quality at high. I believe that goes without saying!
Audio Bitrate Settings
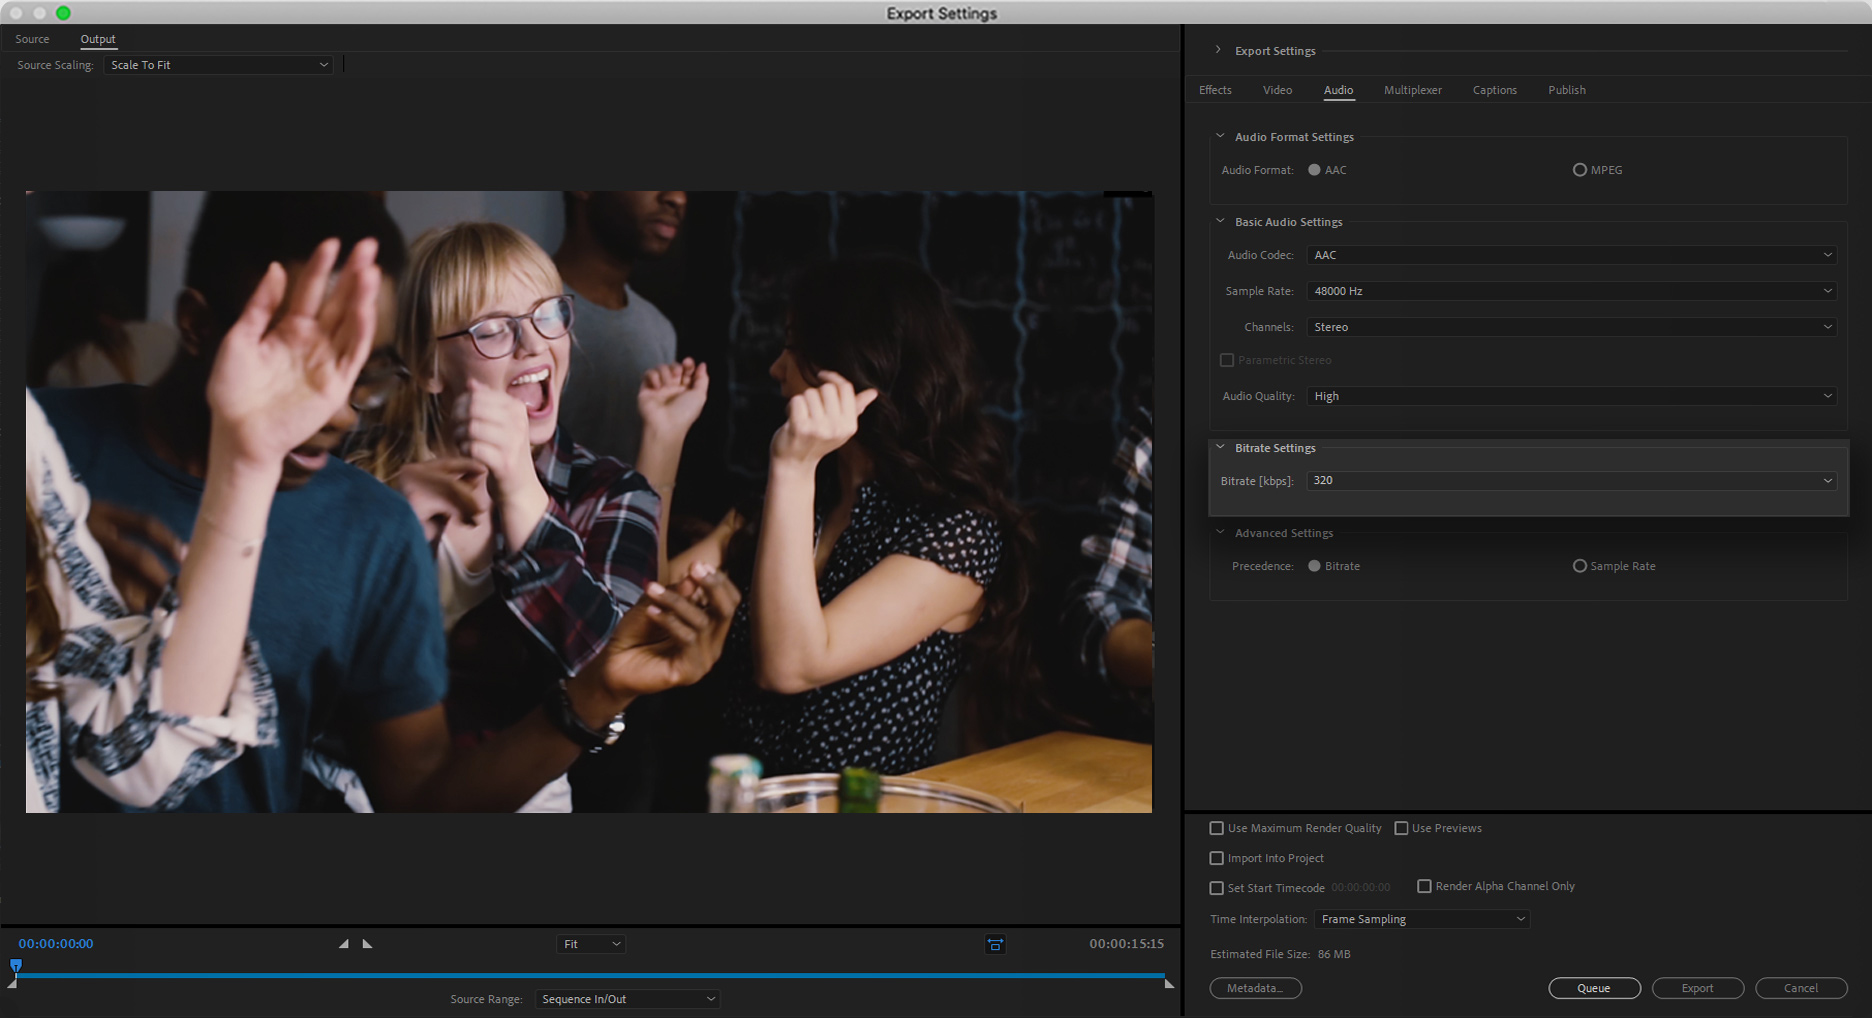
Next option we will see Bitrates again and as I explained before, more bitrates means more data available in each second, so let’s crank it up to 320.
Finally we reach precedence. To put it simply, in this section choosing any option will tell premiere to prioritize it over the other one. But what is the difference between Sample rate and Bitrate, well it is very technical. Bitrate deals with binary computer ones and zeros for digital audio while Sample Rate deals with sound wave forms. I will make a video about both of them when my headache from trying to understand the two heals!
Publish
OK now that we have covered Audio, the other tabs are not that important and I personally have never even use them!
The only tab that may come in handy is the publish tab that will publish your work on to your preferred social media platforms or server. Never used it myself but I can see the appeal and benefits.
Export
Now that we are at the bottom of the render page, we can see the final options left. The only thing that is important here is to check use maximum render quality. Yes it will take longer to render, but again, it’s worth the time.
Rendering Time
Speaking of rendering time, there is a misconception that for example rendering at 4K instead of 720p will take 4 times longer! That can not be farther from the truth. Video resolution does have an effect on render time but no more that maybe 10 percent. The thing that actually effects render time is the complexity of your timeline and the type of effects you have used. For example, one of the effects that hugely “effects” render time is de-noise. My god that thing is load heavy. So if you want to impact your render time, check your timeline and not the video resolution.
All the other options are a bit technical and not that important for general use. Now that everything is set, we can either click Export to begin exporting here in Premiere or click Queue to send the file into Adobe Media Encoder for rendering.
Conclusion; All Export Settings of Premiere Pro
So I hope this video was helpful and helped you achieve better video exporting experience. I will normally hang out in the comment section for sometime after the upload and answer comments so feel free to ask anything that may come to your mind. Anyway, have a great day and see you in the next video.
The best format for exporting videos depends on where you plan to use them. For example, if you plan to upload your video to YouTube, you should export it in H.264 format. If you plan to burn your video to a DVD, you should export it in MPEG-2 format.
There are many different export settings in Premiere Pro, including video codec, bitrate, frame rate, and resolution. You can find more information about these settings in the Premiere Pro Help Center.
To export a video with a specific resolution, select the “Video” tab in the Export window and then set the “Width” and “Height” options to your desired resolution.
To export a video with a specific frame rate, select the “Video” tab in the Export window and then set the “Frame Rate” option to your desired frame rate.
To export a video with a specific bitrate, select the “Video” tab in the Export window and then set the “Bitrate” option to your desired bitrate.
